Nicksxs's Blog

What hurts more, the pain of hard work or the pain of regret?

连接池主要是两个逻辑,首先是获取连接的逻辑,结合代码来讲一讲

1
2
3
4
5
6
7
8
9
10
11
12
13
14
15
16
17
18
19
20
21
22
23
24
25
26
27
28
29
30
31
32
33
34
35
36
37
38
39
40
41
42
43
44
45
46
47
48
49
50
51
52
53
54
55
56
57
58
59
60
61
62
63
64
65
66
67
68
69
70
71
72
73
74
75
76
77
78
79
80
81
82
83
84
85
86
87
88
89
90
91
92
93
94
95
96
97
98
99
100
101
102
103
104
105
106
107
108
109
110
111
112
113
114
115
116
117
118
119
120
121
122
123
124
125
126
127
128
129
130
131
132
133
134
135
136
137
138
139
140
141
142
143
144
145
private PooledConnection popConnection(String username, String password) throws SQLException {
boolean countedWait = false;
PooledConnection conn = null;
long t = System.currentTimeMillis();
int localBadConnectionCount = 0;

// 循环获取连接
while (conn == null) {
// 加锁
lock.lock();
try {
// 如果闲置的连接列表不为空
if (!state.idleConnections.isEmpty()) {
// Pool has available connection
// 连接池有可用的连接
conn = state.idleConnections.remove(0);
if (log.isDebugEnabled()) {
log.debug("Checked out connection " + conn.getRealHashCode() + " from pool.");
}
} else {
// Pool does not have available connection
// 进入这个分支表示没有空闲连接,但是活跃连接数还没达到最大活跃连接数上限,那么这时候就可以创建一个新连接
if (state.activeConnections.size() < poolMaximumActiveConnections) {
// Can create new connection
// 这里创建连接我们之前讲过,
conn = new PooledConnection(dataSource.getConnection(), this);
if (log.isDebugEnabled()) {
log.debug("Created connection " + conn.getRealHashCode() + ".");
}
} else {
// Cannot create new connection
// 进到这个分支了就表示没法创建新连接了,那么怎么办呢,这里引入了一个 poolMaximumCheckoutTime,这代表了我去控制连接一次被使用的最长时间,如果超过这个时间了,我就要去关闭失效它
PooledConnection oldestActiveConnection = state.activeConnections.get(0);
long longestCheckoutTime = oldestActiveConnection.getCheckoutTime();
if (longestCheckoutTime > poolMaximumCheckoutTime) {
// Can claim overdue connection
// 所有超时连接从池中被借出的次数+1
state.claimedOverdueConnectionCount++;
// 所有超时连接从池中被借出并归还的时间总和 + 当前连接借出时间
state.accumulatedCheckoutTimeOfOverdueConnections += longestCheckoutTime;
// 所有连接从池中被借出并归还的时间总和 + 当前连接借出时间
state.accumulatedCheckoutTime += longestCheckoutTime;
// 从活跃连接数中移除此连接
state.activeConnections.remove(oldestActiveConnection);
// 如果该连接不是自动提交的,则尝试回滚
if (!oldestActiveConnection.getRealConnection().getAutoCommit()) {
try {
oldestActiveConnection.getRealConnection().rollback();
} catch (SQLException e) {
/*
Just log a message for debug and continue to execute the following
statement like nothing happened.
Wrap the bad connection with a new PooledConnection, this will help
to not interrupt current executing thread and give current thread a
chance to join the next competition for another valid/good database
connection. At the end of this loop, bad {@link @conn} will be set as null.
*/
log.debug("Bad connection. Could not roll back");
}
}
// 用此连接的真实连接再创建一个连接,并设置时间
conn = new PooledConnection(oldestActiveConnection.getRealConnection(), this);
conn.setCreatedTimestamp(oldestActiveConnection.getCreatedTimestamp());
conn.setLastUsedTimestamp(oldestActiveConnection.getLastUsedTimestamp());
oldestActiveConnection.invalidate();
if (log.isDebugEnabled()) {
log.debug("Claimed overdue connection " + conn.getRealHashCode() + ".");
}
} else {
// Must wait
// 这样还是获取不到连接就只能等待了
try {
// 标记状态,然后把等待计数+1
if (!countedWait) {
state.hadToWaitCount++;
countedWait = true;
}
if (log.isDebugEnabled()) {
log.debug("Waiting as long as " + poolTimeToWait + " milliseconds for connection.");
}
long wt = System.currentTimeMillis();
// 等待 poolTimeToWait 时间
condition.await(poolTimeToWait, TimeUnit.MILLISECONDS);
// 记录等待时间
state.accumulatedWaitTime += System.currentTimeMillis() - wt;
} catch (InterruptedException e) {
// set interrupt flag
Thread.currentThread().interrupt();
break;
}
}
}
}
// 如果连接不为空
if (conn != null) {
// ping to server and check the connection is valid or not
// 判断是否有效
if (conn.isValid()) {
if (!conn.getRealConnection().getAutoCommit()) {
// 回滚未提交的
conn.getRealConnection().rollback();
}
conn.setConnectionTypeCode(assembleConnectionTypeCode(dataSource.getUrl(), username, password));
// 设置时间
conn.setCheckoutTimestamp(System.currentTimeMillis());
conn.setLastUsedTimestamp(System.currentTimeMillis());
// 添加进活跃连接
state.activeConnections.add(conn);
state.requestCount++;
state.accumulatedRequestTime += System.currentTimeMillis() - t;
} else {
if (log.isDebugEnabled()) {
log.debug("A bad connection (" + conn.getRealHashCode() + ") was returned from the pool, getting another connection.");
}
// 连接无效,坏连接+1
state.badConnectionCount++;
localBadConnectionCount++;
conn = null;
// 如果坏连接已经超过了容忍上限,就抛异常
if (localBadConnectionCount > (poolMaximumIdleConnections + poolMaximumLocalBadConnectionTolerance)) {
if (log.isDebugEnabled()) {
log.debug("PooledDataSource: Could not get a good connection to the database.");
}
throw new SQLException("PooledDataSource: Could not get a good connection to the database.");
}
}
}
} finally {
// 释放锁
lock.unlock();
}

}

if (conn == null) {
// 连接仍为空
if (log.isDebugEnabled()) {
log.debug("PooledDataSource: Unknown severe error condition. The connection pool returned a null connection.");
}
// 抛出异常
throw new SQLException("PooledDataSource: Unknown severe error condition. The connection pool returned a null connection.");
}
// fanhui
return conn;
}

然后是还回连接

1
2
3
4
5
6
7
8
9
10
11
12
13
14
15
16
17
18
19
20
21
22
23
24
25
26
27
28
29
30
31
32
33
34
35
36
37
38
39
40
41
42
43
44
45
46
47
48
49
50
protected void pushConnection(PooledConnection conn) throws SQLException {
// 加锁
lock.lock();
try {
// 从活跃连接中移除当前连接
state.activeConnections.remove(conn);
if (conn.isValid()) {
// 当前的空闲连接数小于连接池中允许的最大空闲连接数
if (state.idleConnections.size() < poolMaximumIdleConnections && conn.getConnectionTypeCode() == expectedConnectionTypeCode) {
// 记录借出时间
state.accumulatedCheckoutTime += conn.getCheckoutTime();
if (!conn.getRealConnection().getAutoCommit()) {
// 同样是做回滚
conn.getRealConnection().rollback();
}
// 新建一个连接
PooledConnection newConn = new PooledConnection(conn.getRealConnection(), this);
// 加入到空闲连接列表中
state.idleConnections.add(newConn);
newConn.setCreatedTimestamp(conn.getCreatedTimestamp());
newConn.setLastUsedTimestamp(conn.getLastUsedTimestamp());
// 原连接失效
conn.invalidate();
if (log.isDebugEnabled()) {
log.debug("Returned connection " + newConn.getRealHashCode() + " to pool.");
}
// 提醒前面等待的
condition.signal();
} else {
// 上面是相同的,就是这里是空闲连接数已经超过上限
state.accumulatedCheckoutTime += conn.getCheckoutTime();
if (!conn.getRealConnection().getAutoCommit()) {
conn.getRealConnection().rollback();
}
conn.getRealConnection().close();
if (log.isDebugEnabled()) {
log.debug("Closed connection " + conn.getRealHashCode() + ".");
}
conn.invalidate();
}
} else {
if (log.isDebugEnabled()) {
log.debug("A bad connection (" + conn.getRealHashCode() + ") attempted to return to the pool, discarding connection.");
}
state.badConnectionCount++;
}
} finally {
lock.unlock();
}
}

接着上一篇的折腾记,因为这周又尝试了一些新的措施和方法,想继续记录分享下,上周的整体情况大概是 Ubuntu 系统能进去了,但是 Windows 进不去,PE 也进不去,Windows 启动盘也进不去,因为我的机器加过一个 msata 的固态,Windows 是装在 msata 固态硬盘里的,Ubuntu 是装在机械硬盘里的,所以有了一种猜测就是可能这个固态硬盘有点问题,还有就是还是怀疑内存的问题,正好家里还有个msata 的固态硬盘,是以前想给LD 的旧笔记本换上的,因为买回来放在那没有及时装,后面会又找不到,直到很后面才找到,LD 也不怎么用那个笔记本了,所以就一直放着了,这次我就想拿来换上。
周末回家我就开始尝试了,换上了新的固态硬盘后,插上 Windows 启动 U 盘,这次一开始看起来有点顺利,在 BIOS 选择 U 盘启动,进入了 Windows 安装界面,但是装到一半,后面重启了之后就一直说硬盘有问题,让重启,但是重启并没有解决问题,变成了一直无效地重复重启,再想进 U 盘启动,就又进不去了,这时候怎么说呢,感觉硬盘不是没有问题,但是呢,问题应该不完全出在这,所以按着总体的逻辑来讲,主板带着cpu 跟显卡,都换掉了,硬盘也换掉了,剩下的就是内存了,可是内存我也尝试过把后面加的那条金士顿拔掉,可还是一样,也尝试过用橡皮擦金手指,这里感觉也很奇怪了,找了一圈了都感觉没啥明确的原因,比如其实我的猜测,主板电池的问题,一些电阻坏掉了,但是主板是换过的,那如果内存有问题,照理我用原装的那条应该会没问题,也有一种非常小的可能,就是两条内存都坏了,或者说这也是一种不太可能的可能,所以最后的办法就打算试试把两条内存都换掉,不过现在网上都找不到这个内存的确切信息了,只能根据大致的型号去买来试试,就怕买来的还是坏的,其实也怕是这个买来的主板因为也是别的拆机下来的,不一定保证完全没问题,要是有类似的问题或者也有别的问题导致开不起来就很尴尬,也没有很多专业的仪器可以排查原因,比如主板有没有什么短路的,对了还有一个就是电源问题,但是电源的问题也就可能是从充电器插的口子到主板的连线,因为 LD 的电源跟我的口子一样,也试过,但是结果还是一样,顺着正常逻辑排查,目前也没有剩下很明确的方向了,只能再尝试下看看。

上大学的时候买了第一个笔记本,是联想的小y,y460,配置应该是 i5+2g 内存,500g 硬盘,ati 5650 的显卡,那时候还是比较时髦的带有集显和独显切换的,一些人也觉得它算是一代“神机”,陪我度过了大学四年,还有毕业后的第一年,记得中间还用的比较曲折,差不多第一学期末的时候硬盘感觉有时候会文件操作卡住,去售后看了下,果然硬盘出问题了,还在当场把硬盘的东西都拷贝到新买的移动硬盘里,不过联想的售后还是比较不错的,在保内可以直接免费换,如果出保了估计就要修不起了,后面出了个很大的问题,就是屏幕花屏了,而且它的花屏是横着的会有那种上升的变化,一开始感觉跟湿度还有温度有点关系,天气冷了就很容易出现,天气热了就好一点,出现的概率小一点,而且是合盖后再开会好,过一会又会上升,只是这么度过了保修期,去售后问了下,修一下要两千多,后来是在玉泉学校里面的维修店,好像是花了六百多,省是省了很多,但是后面使用的时候发现有点漏光,而且两三个亮点,总归还是给我那不富裕的经济条件带来了一个正常屏幕,不过是挺影响使用,严格来说都没法用了,后面基本是大半个屏幕花掉,接近整个屏幕花掉,至此大学就是这么用过去了。
噢对了,中间在大二的时候加了一条 2g 的内存,因为像操作系统课需要用虚拟机,2g 内存不太够,不过那会用的都是 32 位的 win7 系统,实际使用用不到 4g 内存,得使用破解补丁才能识别到,后来在大学毕业后由于收入也低,想换其他电脑,特别是 mac,买不起,电脑在那会还会玩玩 DNF,但是风扇声很大,也想优化下,就买了个 msata 的固态硬盘,因为刚好有个口子留着,在那之前一直搜到的是把光驱位拆掉换上 sata 固态硬盘,这对于那会的我来说操作难度实在有点大,换上了msata 固态之后还是有比较大的提升的,把操作系统装到固态硬盘后其他盘就只放数据了,后面还装过黑苹果,只是不小心被室友强制关机了,之后就起不来了,也不知道啥原因,后续想继续按原来的操作装,也没成功,再往后就配了一台台式机,这个笔记本就放在那没啥用了,后面偶尔会拿出来用一下,特别是疫情那会充当了 LD 的临时使用机器。
最近一次就是想把行车记录仪里的视频导出来,结果上传的时候我点了下 win10 的更新,重启后这个机器就起不来了,一开始以为顶多是个重装系统,结果重装也不行,就进不去,插着 U 盘也起不来,一开始还能进 BIOS,后面就直接进不去了,像内存条脏了,擦下金手指什么的,都没搞定,想着也只可能是主板上的部件坏了,所以就开始了这趟半作死之旅,买了块主板来换,拆这个笔记本是真的够难的,开机键那一条是真的拆不开,后面还把两个扣子扳坏了,里面的排线插口还几个也拔坏了,幸好用买来的主板装上还能用,但是后面就很奇怪了,因为这个电脑装了 Ubuntu 跟 win10 的双系统,Ubuntu 能正常起来,但是 win10 就是起不来,插上老毛桃或者 win10 的启动盘都是起不来,老毛桃是能起来,但是进不了 pe,插启动盘又报 0xc00000e9 错误码,现在想着是不是这个固态硬盘有点问题或者还是内存问题,只能后续再看了,拆机的时候也找不到视频,机器实在是太老了,后面再试试看。

作为一个 Windows 的老用户,并且也算是 Windows 系统的半个粉丝,但是秉承一贯的优缺点都应该说的原则,Windows 系统有一点缺点是真的挺难受,相信 Windows 用过比较久的都会经历过,就是 U盘无法退出的问题,在比较远古时代,这个问题似乎能采取的措施不多,关机再拔 U盘的方式是一种比较保险的方式,其他貌似有 360这种可以解除占用的,但是需要安装 360 软件,对于目前的使用环境来说有点得不偿失,也是比较流氓的一类软件了,目前在 Windows 环境我主要就安装了个火绒,或者就用 Windows 自带的 defender。

第一种

最近这次经历也是有火绒的一定责任,在我尝试推出 U盘的时候提示了我被另一个大流氓软件,XlibabaProtect.exe 占用了,这个流氓软件真的是充分展示了某里的技术实力,试过 N 多种办法都关不掉也删不掉,尝试了很多种办法也没办法删除,但是后面换了种思路,一般这种情况肯定是有进程在占用 U盘里的内容,最新版本的 Powertoys 会在文件的右键菜单里添加一个叫 File Locksmith 的功能,可以用于检查正在使用哪些文件以及由哪些进程使用,但是可能是我的使用姿势不对,没有仔细看文档,它里面有个”以管理员身份重启”,可能会有用。
这算是第一种方式,

第二种

第二种方式是 Windows 任务管理器中性能 tab 下的”打开资源监视器”,
,假如我的 U 盘的盘符是F:
就可以搜索到占用这个盘符下文件的进程,这里千万小心‼️‼️,不可轻易杀掉这些进程,有些系统进程如果轻易杀掉会导致蓝屏等问题,不可轻易尝试,除非能确认这些进程的作用。
对于前两种方式对我来说都无效,

第三种

所以尝试了第三种,
就是磁盘脱机的方式,在”计算机”右键管理,点击”磁盘管理”,可以找到 U 盘盘符右键,点击”脱机”,然后再”推出”,这个对我来说也不行

第四种

这种是唯一对我有效的,在开始菜单搜索”event”,可以搜到”事件查看器”,
,这个可以看到当前最近 Windows 发生的事件,打开这个后就点击U盘推出,因为推不出来也是一种错误事件,点击下刷新就能在这看到具体是因为什么推出不了,具体的进程信息
最后发现是英特尔的驱动管理程序的一个进程,关掉就退出了,虽然前面说的某里的进程是流氓,但这边是真的冤枉它了

最近或者说很久以前就想着能够把几个散装服务器以及家里的网络连起来,譬如一些remote desktop的访问,之前搞了下frp,因为家里电脑没怎么注意安全性就被搞了一下,所以还是想用相对更安全的方式,比如限定ip和端口进行访问,但是感觉ip也不固定就比较难搞,后来看到了 TailscaleHeadscale 的方式,就想着试试看,没想到一开始就踩了几个比较莫名其妙的坑。
可以按官方文档去搭建,也可以在网上找一些其他人搭建的教程。我碰到的主要是关于配置文件的问题

第一个问题

1
Error initializing error="failed to read or create private key: failed to save private key to disk: open /etc/headscale/private.key: read-only file system"

其实一开始看到这个我都有点懵了,咋回事呢,read-only file system一般有可能是文件系统出问题了,不可写入,需要重启或者修改挂载方式,被这个错误的错误日志给误导了,后面才知道是配置文件,在另一个教程中也有个类似的回复,一开始没注意,其实就是同一个问题。
默认的配置文件是这样的

1
2
3
4
5
6
7
8
9
10
11
12
13
14
15
16
17
18
19
20
21
22
23
24
25
26
27
28
29
30
31
32
33
34
35
36
37
38
39
40
41
42
43
44
45
46
47
48
49
50
51
52
53
54
55
56
57
58
59
60
61
62
63
64
65
66
67
68
69
70
71
72
73
74
75
76
77
78
79
80
81
82
83
84
85
86
87
88
89
90
91
92
93
94
95
96
97
98
99
100
101
102
103
104
105
106
107
108
109
110
111
112
113
114
115
116
117
118
119
120
121
122
123
124
125
126
127
128
129
130
131
132
133
134
135
136
137
138
139
140
141
142
143
144
145
146
147
148
149
150
151
152
153
154
155
156
157
158
159
160
161
162
163
164
165
166
167
168
169
170
171
172
173
174
175
176
177
178
179
180
181
182
183
184
185
186
187
188
189
190
191
192
193
194
195
196
197
198
199
200
201
202
203
204
205
206
207
208
209
210
211
212
213
214
215
216
217
218
219
220
221
222
223
224
225
226
227
228
229
230
231
232
233
234
235
236
237
238
239
240
241
242
243
244
245
246
247
248
249
250
251
252
253
254
255
256
257
258
259
260
261
262
263
264
265
266
267
268
269
270
271
272
273
274
275
276
277
278
279
280
281
282
283
284
285
286
287
288
289
290
291
292
293
294
295
296
297
298
299
300
301
302
303
304
305
306
307
308
309
310
311
312
313
314
315
316
317
318
319
320
321
322
---
# headscale will look for a configuration file named `config.yaml` (or `config.json`) in the following order:
#
# - `/etc/headscale`
# - `~/.headscale`
# - current working directory

# The url clients will connect to.
# Typically this will be a domain like:
#
# https://myheadscale.example.com:443
#
server_url: http://127.0.0.1:8080

# Address to listen to / bind to on the server
#
# For production:
# listen_addr: 0.0.0.0:8080
listen_addr: 127.0.0.1:8080

# Address to listen to /metrics, you may want
# to keep this endpoint private to your internal
# network
#
metrics_listen_addr: 127.0.0.1:9090

# Address to listen for gRPC.
# gRPC is used for controlling a headscale server
# remotely with the CLI
# Note: Remote access _only_ works if you have
# valid certificates.
#
# For production:
# grpc_listen_addr: 0.0.0.0:50443
grpc_listen_addr: 127.0.0.1:50443

# Allow the gRPC admin interface to run in INSECURE
# mode. This is not recommended as the traffic will
# be unencrypted. Only enable if you know what you
# are doing.
grpc_allow_insecure: false

# Private key used to encrypt the traffic between headscale
# and Tailscale clients.
# The private key file will be autogenerated if it's missing.
#
# For production:
# /var/lib/headscale/private.key
private_key_path: ./private.key

# The Noise section includes specific configuration for the
# TS2021 Noise protocol
noise:
# The Noise private key is used to encrypt the
# traffic between headscale and Tailscale clients when
# using the new Noise-based protocol. It must be different
# from the legacy private key.
#
# For production:
# private_key_path: /var/lib/headscale/noise_private.key
private_key_path: ./noise_private.key

# List of IP prefixes to allocate tailaddresses from.
# Each prefix consists of either an IPv4 or IPv6 address,
# and the associated prefix length, delimited by a slash.
# While this looks like it can take arbitrary values, it
# needs to be within IP ranges supported by the Tailscale
# client.
# IPv6: https://github.com/tailscale/tailscale/blob/22ebb25e833264f58d7c3f534a8b166894a89536/net/tsaddr/tsaddr.go#LL81C52-L81C71
# IPv4: https://github.com/tailscale/tailscale/blob/22ebb25e833264f58d7c3f534a8b166894a89536/net/tsaddr/tsaddr.go#L33
ip_prefixes:
- fd7a:115c:a1e0::/48
- 100.64.0.0/10

# DERP is a relay system that Tailscale uses when a direct
# connection cannot be established.
# https://tailscale.com/blog/how-tailscale-works/#encrypted-tcp-relays-derp
#
# headscale needs a list of DERP servers that can be presented
# to the clients.
derp:
server:
# If enabled, runs the embedded DERP server and merges it into the rest of the DERP config
# The Headscale server_url defined above MUST be using https, DERP requires TLS to be in place
enabled: false

# Region ID to use for the embedded DERP server.
# The local DERP prevails if the region ID collides with other region ID coming from
# the regular DERP config.
region_id: 999

# Region code and name are displayed in the Tailscale UI to identify a DERP region
region_code: "headscale"
region_name: "Headscale Embedded DERP"

# Listens over UDP at the configured address for STUN connections - to help with NAT traversal.
# When the embedded DERP server is enabled stun_listen_addr MUST be defined.
#
# For more details on how this works, check this great article: https://tailscale.com/blog/how-tailscale-works/
stun_listen_addr: "0.0.0.0:3478"

# List of externally available DERP maps encoded in JSON
urls:
- https://controlplane.tailscale.com/derpmap/default

# Locally available DERP map files encoded in YAML
#
# This option is mostly interesting for people hosting
# their own DERP servers:
# https://tailscale.com/kb/1118/custom-derp-servers/
#
# paths:
# - /etc/headscale/derp-example.yaml
paths: []

# If enabled, a worker will be set up to periodically
# refresh the given sources and update the derpmap
# will be set up.
auto_update_enabled: true

# How often should we check for DERP updates?
update_frequency: 24h

# Disables the automatic check for headscale updates on startup
disable_check_updates: false

# Time before an inactive ephemeral node is deleted?
ephemeral_node_inactivity_timeout: 30m

# Period to check for node updates within the tailnet. A value too low will severely affect
# CPU consumption of Headscale. A value too high (over 60s) will cause problems
# for the nodes, as they won't get updates or keep alive messages frequently enough.
# In case of doubts, do not touch the default 10s.
node_update_check_interval: 10s

# SQLite config
db_type: sqlite3

# For production:
# db_path: /var/lib/headscale/db.sqlite
db_path: ./db.sqlite

# # Postgres config
# If using a Unix socket to connect to Postgres, set the socket path in the 'host' field and leave 'port' blank.
# db_type: postgres
# db_host: localhost
# db_port: 5432
# db_name: headscale
# db_user: foo
# db_pass: bar

# If other 'sslmode' is required instead of 'require(true)' and 'disabled(false)', set the 'sslmode' you need
# in the 'db_ssl' field. Refers to https://www.postgresql.org/docs/current/libpq-ssl.html Table 34.1.
# db_ssl: false

### TLS configuration
#
## Let's encrypt / ACME
#
# headscale supports automatically requesting and setting up
# TLS for a domain with Let's Encrypt.
#
# URL to ACME directory
acme_url: https://acme-v02.api.letsencrypt.org/directory

# Email to register with ACME provider
acme_email: ""

# Domain name to request a TLS certificate for:
tls_letsencrypt_hostname: ""

# Path to store certificates and metadata needed by
# letsencrypt
# For production:
# tls_letsencrypt_cache_dir: /var/lib/headscale/cache
tls_letsencrypt_cache_dir: ./cache

# Type of ACME challenge to use, currently supported types:
# HTTP-01 or TLS-ALPN-01
# See [docs/tls.md](docs/tls.md) for more information
tls_letsencrypt_challenge_type: HTTP-01
# When HTTP-01 challenge is chosen, letsencrypt must set up a
# verification endpoint, and it will be listening on:
# :http = port 80
tls_letsencrypt_listen: ":http"

## Use already defined certificates:
tls_cert_path: ""
tls_key_path: ""

log:
# Output formatting for logs: text or json
format: text
level: info

# Path to a file containg ACL policies.
# ACLs can be defined as YAML or HUJSON.
# https://tailscale.com/kb/1018/acls/
acl_policy_path: ""

## DNS
#
# headscale supports Tailscale's DNS configuration and MagicDNS.
# Please have a look to their KB to better understand the concepts:
#
# - https://tailscale.com/kb/1054/dns/
# - https://tailscale.com/kb/1081/magicdns/
# - https://tailscale.com/blog/2021-09-private-dns-with-magicdns/
#
dns_config:
# Whether to prefer using Headscale provided DNS or use local.
override_local_dns: true

# List of DNS servers to expose to clients.
nameservers:
- 1.1.1.1

# NextDNS (see https://tailscale.com/kb/1218/nextdns/).
# "abc123" is example NextDNS ID, replace with yours.
#
# With metadata sharing:
# nameservers:
# - https://dns.nextdns.io/abc123
#
# Without metadata sharing:
# nameservers:
# - 2a07:a8c0::ab:c123
# - 2a07:a8c1::ab:c123

# Split DNS (see https://tailscale.com/kb/1054/dns/),
# list of search domains and the DNS to query for each one.
#
# restricted_nameservers:
# foo.bar.com:
# - 1.1.1.1
# darp.headscale.net:
# - 1.1.1.1
# - 8.8.8.8

# Search domains to inject.
domains: []

# Extra DNS records
# so far only A-records are supported (on the tailscale side)
# See https://github.com/juanfont/headscale/blob/main/docs/dns-records.md#Limitations
# extra_records:
# - name: "grafana.myvpn.example.com"
# type: "A"
# value: "100.64.0.3"
#
# # you can also put it in one line
# - { name: "prometheus.myvpn.example.com", type: "A", value: "100.64.0.3" }

# Whether to use [MagicDNS](https://tailscale.com/kb/1081/magicdns/).
# Only works if there is at least a nameserver defined.
magic_dns: true

# Defines the base domain to create the hostnames for MagicDNS.
# `base_domain` must be a FQDNs, without the trailing dot.
# The FQDN of the hosts will be
# `hostname.user.base_domain` (e.g., _myhost.myuser.example.com_).
base_domain: example.com

# Unix socket used for the CLI to connect without authentication
# Note: for production you will want to set this to something like:
# unix_socket: /var/run/headscale.sock
unix_socket: ./headscale.sock
unix_socket_permission: "0770"
#
# headscale supports experimental OpenID connect support,
# it is still being tested and might have some bugs, please
# help us test it.
# OpenID Connect
# oidc:
# only_start_if_oidc_is_available: true
# issuer: "https://your-oidc.issuer.com/path"
# client_id: "your-oidc-client-id"
# client_secret: "your-oidc-client-secret"
# # Alternatively, set `client_secret_path` to read the secret from the file.
# # It resolves environment variables, making integration to systemd's
# # `LoadCredential` straightforward:
# client_secret_path: "${CREDENTIALS_DIRECTORY}/oidc_client_secret"
# # client_secret and client_secret_path are mutually exclusive.
#
# Customize the scopes used in the OIDC flow, defaults to "openid", "profile" and "email" and add custom query
# parameters to the Authorize Endpoint request. Scopes default to "openid", "profile" and "email".
#
# scope: ["openid", "profile", "email", "custom"]
# extra_params:
# domain_hint: example.com
#
# List allowed principal domains and/or users. If an authenticated user's domain is not in this list, the
# authentication request will be rejected.
#
# allowed_domains:
# - example.com
# Groups from keycloak have a leading '/'
# allowed_groups:
# - /headscale
# allowed_users:
# - alice@example.com
#
# If `strip_email_domain` is set to `true`, the domain part of the username email address will be removed.
# This will transform `first-name.last-name@example.com` to the user `first-name.last-name`
# If `strip_email_domain` is set to `false` the domain part will NOT be removed resulting to the following
# user: `first-name.last-name.example.com`
#
# strip_email_domain: true

# Logtail configuration
# Logtail is Tailscales logging and auditing infrastructure, it allows the control panel
# to instruct tailscale nodes to log their activity to a remote server.
logtail:
# Enable logtail for this headscales clients.
# As there is currently no support for overriding the log server in headscale, this is
# disabled by default. Enabling this will make your clients send logs to Tailscale Inc.
enabled: false

# Enabling this option makes devices prefer a random port for WireGuard traffic over the
# default static port 41641. This option is intended as a workaround for some buggy
# firewall devices. See https://tailscale.com/kb/1181/firewalls/ for more information.
randomize_client_port: false

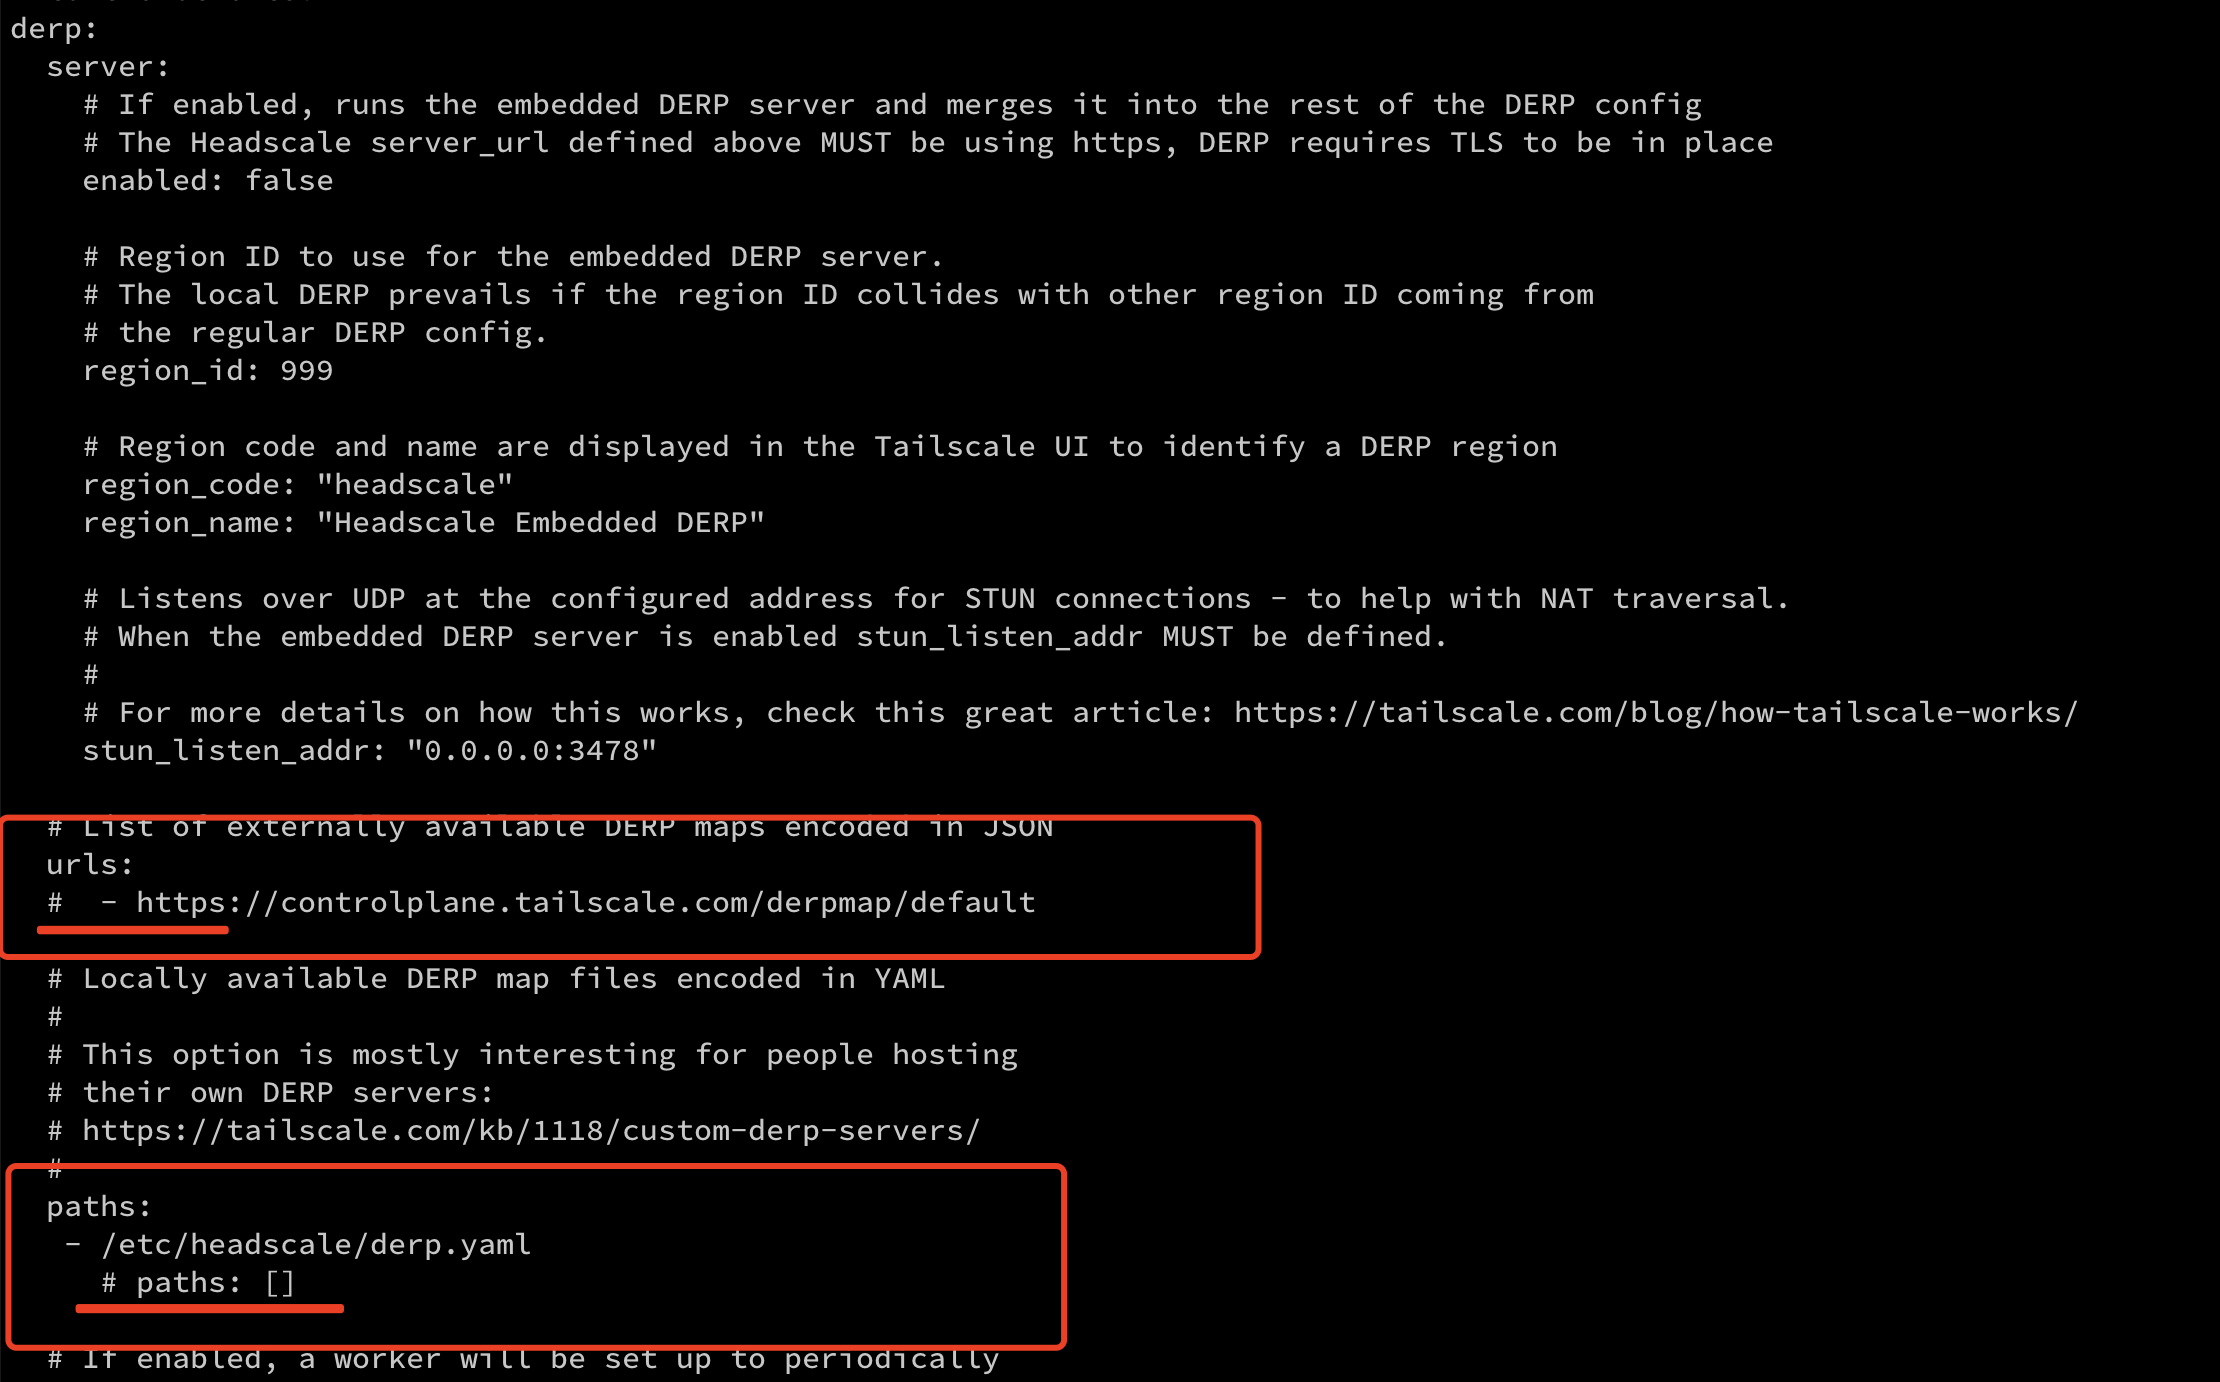
问题就是出在几个文件路径的配置,默认都是当前目录,也就是headscale的可执行文件所在目录,需要按它配置说明中的生产配置进行修改

1
2
3
# For production:
# /var/lib/headscale/private.key
private_key_path: /var/lib/headscale/private.key

直接改成绝对路径就好了,还有两个文件路径
另一个也是个秘钥的路径问题

1
2
3
4
5
6
7
8
9
noise:
# The Noise private key is used to encrypt the
# traffic between headscale and Tailscale clients when
# using the new Noise-based protocol. It must be different
# from the legacy private key.
#
# For production:
# private_key_path: /var/lib/headscale/noise_private.key
private_key_path: /var/lib/headscale/noise_private.key

第二个问题

这个问题也是一种误导,
错误信息是

1
Error initializing error="unable to open database file: out of memory (14)"

这就是个文件,内存也完全没有被占满的迹象,原来也是文件路径的问题

1
2
3
# For production:
# db_path: /var/lib/headscale/db.sqlite
db_path: /var/lib/headscale/db.sqlite

都改成绝对路径就可以了,然后这里还有个就是要对/var/lib/headscale//etc/headscale/等路径赋予headscale用户权限,有时候对这类问题的排查真的蛮头疼,日志报错都不是真实的错误信息,开源项目对这些错误的提示真的也需要优化,后续的譬如mac也加入节点等后面再开篇讲

0%