Nicksxs's Blog

What hurts more, the pain of hard work or the pain of regret?

Tomcat 会把请求委托到
org.springframework.web.servlet.DispatcherServlet#doService

1
2
3
4
5
6
7
protected void doService(HttpServletRequest request, HttpServletResponse response) throws Exception {
logRequest(request);

// 省略前面的代码
try {
doDispatch(request, response);
}

然后就是调用
org.springframework.web.servlet.DispatcherServlet#doDispatch

1
2
3
4
5
6
7
8
9
10
11
12
13
14
15
16
17
18
19
20
21
22
23
24
25
26
27
28
29
30
31
32
33
34
35
36
37
38
protected void doDispatch(HttpServletRequest request, HttpServletResponse response) throws Exception {

try {
ModelAndView mv = null;
Exception dispatchException = null;

try {
processedRequest = checkMultipart(request);
multipartRequestParsed = (processedRequest != request);

// 去获取处理器
// Determine handler for the current request.
mappedHandler = getHandler(processedRequest);
if (mappedHandler == null) {
noHandlerFound(processedRequest, response);
return;
}

// Determine handler adapter for the current request.
HandlerAdapter ha = getHandlerAdapter(mappedHandler.getHandler());

// Process last-modified header, if supported by the handler.
String method = request.getMethod();
boolean isGet = HttpMethod.GET.matches(method);
if (isGet || HttpMethod.HEAD.matches(method)) {
long lastModified = ha.getLastModified(request, mappedHandler.getHandler());
if (new ServletWebRequest(request, response).checkNotModified(lastModified) && isGet) {
return;
}
}

if (!mappedHandler.applyPreHandle(processedRequest, response)) {
return;
}

// Actually invoke the handler.
mv = ha.handle(processedRequest, response, mappedHandler.getHandler());

看下这里的逻辑

1
2
3
4
5
6
7
8
9
10
11
12
@Nullable
protected HandlerExecutionChain getHandler(HttpServletRequest request) throws Exception {
if (this.handlerMappings != null) {
for (HandlerMapping mapping : this.handlerMappings) {
HandlerExecutionChain handler = mapping.getHandler(request);
if (handler != null) {
return handler;
}
}
}
return null;
}

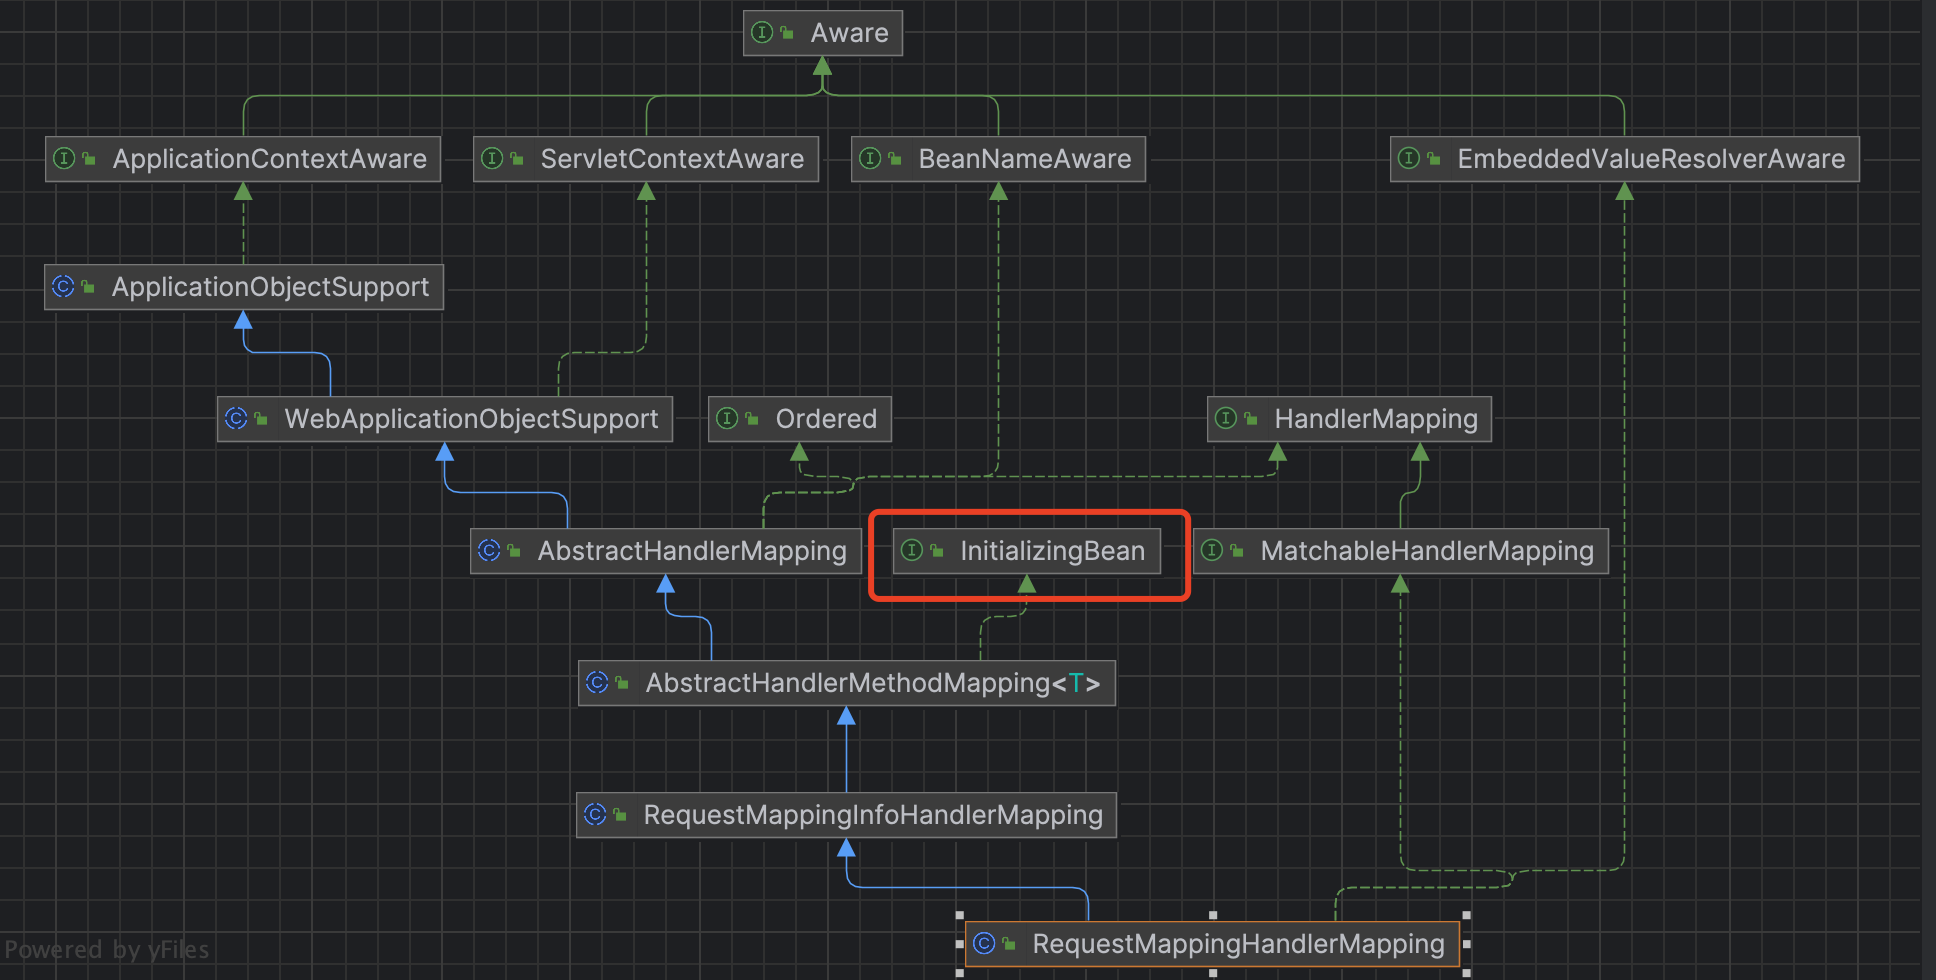
可以看到有这些 HandlerMapping
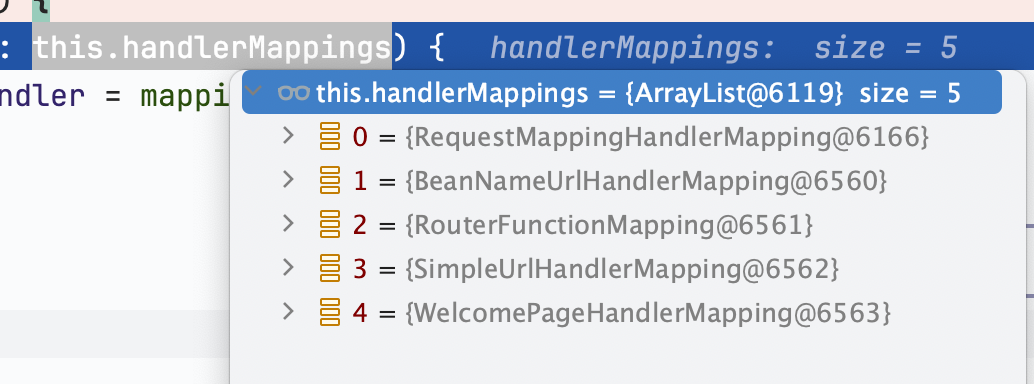
而这里面就是前面提到过的
org.springframework.web.servlet.mvc.method.annotation.RequestMappingHandlerMapping
从这就能找到具体的 Handler
com.nicksxs.spbdemo.controller.DemoController#test()
这就是我简单的示例代码

1
2
3
4
5
6
7
8
9
@RequestMapping(value = "/test", method = RequestMethod.GET)
@ResponseBody
public DemoResponse test() {
String item = "{\"id\": 1, \"name\": \"nick\"}";
ParserConfig parserConfig = ParserConfig.getGlobalInstance();
parserConfig.propertyNamingStrategy = PropertyNamingStrategy.SnakeCase;
DemoResponse response = JSON.parseObject(item, DemoResponse.class, parserConfig);
return response;
}

下一步是再获取处理器的适配器,
org.springframework.web.servlet.mvc.method.annotation.RequestMappingHandlerAdapter

1
2
3
4
5
6
7
8
9
10
11
protected HandlerAdapter getHandlerAdapter(Object handler) throws ServletException {
if (this.handlerAdapters != null) {
for (HandlerAdapter adapter : this.handlerAdapters) {
if (adapter.supports(handler)) {
return adapter;
}
}
}
throw new ServletException("No adapter for handler [" + handler +
"]: The DispatcherServlet configuration needs to include a HandlerAdapter that supports this handler");
}

正好这个适配器是调用的父类的 supports 方法

1
2
3
4
@Override
public final boolean supports(Object handler) {
return (handler instanceof HandlerMethod && supportsInternal((HandlerMethod) handler));
}

而我这个com.nicksxs.spbdemo.controller.DemoController#test()
就是个包装好的 HandlerMethod
然后就是调用 hahandle 方法,也是通过模板方法,实际调用的是
org.springframework.web.servlet.mvc.method.AbstractHandlerMethodAdapter#handle

1
2
3
4
5
6
7
@Override
@Nullable
public final ModelAndView handle(HttpServletRequest request, HttpServletResponse response, Object handler)
throws Exception {

return handleInternal(request, response, (HandlerMethod) handler);
}

然后调用
org.springframework.web.servlet.mvc.method.annotation.RequestMappingHandlerAdapter#handleInternal

1
2
3
4
5
6
7
8
9
10
11
12
13
14
15
16
17
18
19
20
21
22
23
24
25
26
@Override
protected ModelAndView handleInternal(HttpServletRequest request,
HttpServletResponse response, HandlerMethod handlerMethod) throws Exception {

ModelAndView mav;
checkRequest(request);

// Execute invokeHandlerMethod in synchronized block if required.
if (this.synchronizeOnSession) {
HttpSession session = request.getSession(false);
if (session != null) {
Object mutex = WebUtils.getSessionMutex(session);
synchronized (mutex) {
mav = invokeHandlerMethod(request, response, handlerMethod);
}
}
else {
// No HttpSession available -> no mutex necessary
mav = invokeHandlerMethod(request, response, handlerMethod);
}
}
else {
// 是否要锁定 session,否则走到这
// No synchronization on session demanded at all...
mav = invokeHandlerMethod(request, response, handlerMethod);
}

继续调用
org.springframework.web.servlet.mvc.method.annotation.RequestMappingHandlerAdapter#invokeHandlerMethod

1
2
3
4
5
6
7
8
9
10
11
12
13
14
15
16
17
18
19
20
21
22
23
24
@Nullable
protected ModelAndView invokeHandlerMethod(HttpServletRequest request,
HttpServletResponse response, HandlerMethod handlerMethod) throws Exception {

ServletWebRequest webRequest = new ServletWebRequest(request, response);
try {
WebDataBinderFactory binderFactory = getDataBinderFactory(handlerMethod);
ModelFactory modelFactory = getModelFactory(handlerMethod, binderFactory);

// 包装调用方法,
ServletInvocableHandlerMethod invocableMethod = createInvocableHandlerMethod(handlerMethod);
// 省略一部分非本次关注核心代码
// 然后是调用到这
invocableMethod.invokeAndHandle(webRequest, mavContainer);
if (asyncManager.isConcurrentHandlingStarted()) {
return null;
}

return getModelAndView(mavContainer, modelFactory, webRequest);
}
finally {
webRequest.requestCompleted();
}
}

稍微再看一眼
第一步是
org.springframework.web.servlet.mvc.method.annotation.RequestMappingHandlerAdapter#createInvocableHandlerMethod

1
2
3
protected ServletInvocableHandlerMethod createInvocableHandlerMethod(HandlerMethod handlerMethod) {
return new ServletInvocableHandlerMethod(handlerMethod);
}

第二步是
org.springframework.web.servlet.mvc.method.annotation.ServletInvocableHandlerMethod#ServletInvocableHandlerMethod(org.springframework.web.method.HandlerMethod)

1
2
3
   public ServletInvocableHandlerMethod(HandlerMethod handlerMethod) {
super(handlerMethod);
}

第三步是
org.springframework.web.method.support.InvocableHandlerMethod#InvocableHandlerMethod(org.springframework.web.method.HandlerMethod)

1
2
3
   public InvocableHandlerMethod(HandlerMethod handlerMethod) {
super(handlerMethod);
}

第四步是
org.springframework.web.method.HandlerMethod#HandlerMethod(org.springframework.web.method.HandlerMethod)

1
2
3
4
5
6
7
8
9
10
11
12
13
protected HandlerMethod(HandlerMethod handlerMethod) {
Assert.notNull(handlerMethod, "HandlerMethod is required");
this.bean = handlerMethod.bean;
this.beanFactory = handlerMethod.beanFactory;
this.beanType = handlerMethod.beanType;
this.method = handlerMethod.method;
this.bridgedMethod = handlerMethod.bridgedMethod;
this.parameters = handlerMethod.parameters;
this.responseStatus = handlerMethod.responseStatus;
this.responseStatusReason = handlerMethod.responseStatusReason;
this.description = handlerMethod.description;
this.resolvedFromHandlerMethod = handlerMethod.resolvedFromHandlerMethod;
}

这是个继承关系,一直调用到最顶层的父类的构造方法,其实就是拷贝,然后继续调用
org.springframework.web.servlet.mvc.method.annotation.ServletInvocableHandlerMethod#invokeAndHandle

1
2
3
4
5
6
7
public void invokeAndHandle(ServletWebRequest webRequest, ModelAndViewContainer mavContainer,
Object... providedArgs) throws Exception {

// 调用请求
Object returnValue = invokeForRequest(webRequest, mavContainer, providedArgs);
// 稍微忽略下后面的代码
}

继续调用
org.springframework.web.method.support.InvocableHandlerMethod#invokeForRequest

1
2
3
4
5
6
7
8
9
10
@Nullable
public Object invokeForRequest(NativeWebRequest request, @Nullable ModelAndViewContainer mavContainer,
Object... providedArgs) throws Exception {

Object[] args = getMethodArgumentValues(request, mavContainer, providedArgs);
if (logger.isTraceEnabled()) {
logger.trace("Arguments: " + Arrays.toString(args));
}
return doInvoke(args);
}

来到了最核心处
org.springframework.web.method.support.InvocableHandlerMethod#doInvoke

1
2
3
4
5
6
7
8
9
10
11
@Nullable
protected Object doInvoke(Object... args) throws Exception {
Method method = getBridgedMethod();
ReflectionUtils.makeAccessible(method);
try {
if (KotlinDetector.isSuspendingFunction(method)) {
return CoroutinesUtils.invokeSuspendingFunction(method, getBean(), args);
}
// 会走到这里,获取到 bean,而这个 bean 就是前面构造方法里赋值的,最开始被放在 handler 里面,然后调用方法
return method.invoke(getBean(), args);
}

springboot 的一个方便之处就是集成了 web server 进去,接着上一篇继续来看下这个 web server 的启动过程
这边是基于 springboot 的 2.2.9.RELEASE 版本,整个 springboot 体系主体就是看
org.springframework.context.support.AbstractApplicationContext#refresh
刷新方法,而启动 web server 的方法就是在其中的 onRefresh

1
2
3
4
5
6
7
8
9
10
11
12
13
14
15
16
17
18
19
20
21
22
23
24
25
26
27
28
29
try {
// Allows post-processing of the bean factory in context subclasses.
postProcessBeanFactory(beanFactory);

// Invoke factory processors registered as beans in the context.
invokeBeanFactoryPostProcessors(beanFactory);

// Register bean processors that intercept bean creation.
registerBeanPostProcessors(beanFactory);

// Initialize message source for this context.
initMessageSource();

// Initialize event multicaster for this context.
initApplicationEventMulticaster();

// Initialize other special beans in specific context subclasses.
// ------------------> ‼️就是这里
onRefresh();

// Check for listener beans and register them.
registerListeners();

// Instantiate all remaining (non-lazy-init) singletons.
finishBeanFactoryInitialization(beanFactory);

// Last step: publish corresponding event.
finishRefresh();
}

跟进去其实本身是啥都不做的,由具体的实现类子类去做各自的处理
org.springframework.context.support.AbstractApplicationContext#onRefresh

1
2
3
4
5
6
7
8
9
10
/**
* Template method which can be overridden to add context-specific refresh work.
* Called on initialization of special beans, before instantiation of singletons.
* <p>This implementation is empty.
* @throws BeansException in case of errors
* @see #refresh()
*/
protected void onRefresh() throws BeansException {
// For subclasses: do nothing by default.
}

看具体的实现类里就有我们的主角
org.springframework.boot.web.servlet.context.ServletWebServerApplicationContext#onRefresh

1
2
3
4
5
6
7
8
9
10
protected void onRefresh() {
super.onRefresh();

try {
// -------------> 主要就是这里,创建 webserver
this.createWebServer();
} catch (Throwable var2) {
throw new ApplicationContextException("Unable to start web server", var2);
}
}

具体的就是一些前置处理
org.springframework.boot.web.servlet.context.ServletWebServerApplicationContext#createWebServer

1
2
3
4
5
6
7
8
9
10
11
12
13
14
15
16
private void createWebServer() {
WebServer webServer = this.webServer;
ServletContext servletContext = this.getServletContext();
if (webServer == null && servletContext == null) {
ServletWebServerFactory factory = this.getWebServerFactory();
this.webServer = factory.getWebServer(new ServletContextInitializer[]{this.getSelfInitializer()});
} else if (servletContext != null) {
try {
this.getSelfInitializer().onStartup(servletContext);
} catch (ServletException var4) {
throw new ApplicationContextException("Cannot initialize servlet context", var4);
}
}

this.initPropertySources();
}

初始的 webServer 和 servletContext 都是 null,需要进行初始化
先是获取 WebServer 工厂,
org.springframework.boot.web.servlet.context.ServletWebServerApplicationContext#getWebServerFactory

1
2
3
4
5
6
7
8
9
10
11
protected ServletWebServerFactory getWebServerFactory() {
String[] beanNames = this.getBeanFactory().getBeanNamesForType(ServletWebServerFactory.class);
if (beanNames.length == 0) {
throw new ApplicationContextException("Unable to start ServletWebServerApplicationContext due to missing ServletWebServerFactory bean.");
} else if (beanNames.length > 1) {
throw new ApplicationContextException("Unable to start ServletWebServerApplicationContext due to multiple ServletWebServerFactory beans : " + StringUtils.arrayToCommaDelimitedString(beanNames));
} else {
return (ServletWebServerFactory)this.getBeanFactory().getBean(beanNames[0], ServletWebServerFactory.class);
}
}

获取了类型是 ServletWebServerFactory 的 bean,然后再回来就是调用的接口方法
org.springframework.boot.web.servlet.server.ServletWebServerFactory#getWebServer
根据具体的 factory 来生成对应的譬如 tomcat 的 factory,
org.springframework.boot.web.embedded.tomcat.TomcatServletWebServerFactory#getWebServer

1
2
3
4
5
6
7
8
9
10
11
12
13
14
15
16
17
18
19
20
21
@Override
public WebServer getWebServer(ServletContextInitializer... initializers) {
if (this.disableMBeanRegistry) {
Registry.disableRegistry();
}
Tomcat tomcat = new Tomcat();
File baseDir = (this.baseDirectory != null) ? this.baseDirectory : createTempDir("tomcat");
tomcat.setBaseDir(baseDir.getAbsolutePath());
Connector connector = new Connector(this.protocol);
connector.setThrowOnFailure(true);
tomcat.getService().addConnector(connector);
customizeConnector(connector);
tomcat.setConnector(connector);
tomcat.getHost().setAutoDeploy(false);
configureEngine(tomcat.getEngine());
for (Connector additionalConnector : this.additionalTomcatConnectors) {
tomcat.getService().addConnector(additionalConnector);
}
prepareContext(tomcat.getHost(), initializers);
return getTomcatWebServer(tomcat);
}

最后一行就是创建 TomcatWebServer,
org.springframework.boot.web.embedded.tomcat.TomcatServletWebServerFactory#getTomcatWebServer

1
2
3
4
5
6
7
8
9
10
/**
* Factory method called to create the {@link TomcatWebServer}. Subclasses can
* override this method to return a different {@link TomcatWebServer} or apply
* additional processing to the Tomcat server.
* @param tomcat the Tomcat server.
* @return a new {@link TomcatWebServer} instance
*/
protected TomcatWebServer getTomcatWebServer(Tomcat tomcat) {
return new TomcatWebServer(tomcat, getPort() >= 0);
}

这里面就开始 new 了一个 TomcatWebServer,
org.springframework.boot.web.embedded.tomcat.TomcatWebServer#TomcatWebServer(org.apache.catalina.startup.Tomcat, boolean)

1
2
3
4
5
6
public TomcatWebServer(Tomcat tomcat, boolean autoStart) {
Assert.notNull(tomcat, "Tomcat Server must not be null");
this.tomcat = tomcat;
this.autoStart = autoStart;
initialize();
}

再调用里面的初始化方法,
org.springframework.boot.web.embedded.tomcat.TomcatWebServer#initialize

1
2
3
4
5
6
7
8
9
10
11
12
13
14
15
16
17
18
19
20
21
22
23
24
25
26
27
28
29
30
31
32
33
34
35
36
37
38
39
40
41
42
43
44
45
46
47
48
49
50
51
52
53
54
55
56
57
58
59
60
61
62
63
64
private void initialize() throws WebServerException {
logger.info("Tomcat initialized with port(s): " + getPortsDescription(false));
synchronized (this.monitor) {
try {
addInstanceIdToEngineName();

Context context = findContext();
context.addLifecycleListener((event) -> {
if (context.equals(event.getSource()) && Lifecycle.START_EVENT.equals(event.getType())) {
// Remove service connectors so that protocol binding doesn't
// happen when the service is started.
removeServiceConnectors();
}
});

// Start the server to trigger initialization listeners
this.tomcat.start();

// We can re-throw failure exception directly in the main thread
rethrowDeferredStartupExceptions();

try {
ContextBindings.bindClassLoader(context, context.getNamingToken(), getClass().getClassLoader());
}
catch (NamingException ex) {
// Naming is not enabled. Continue
}

// Unlike Jetty, all Tomcat threads are daemon threads. We create a
// blocking non-daemon to stop immediate shutdown
startDaemonAwaitThread();
}
catch (Exception ex) {
stopSilently();
destroySilently();
throw new WebServerException("Unable to start embedded Tomcat", ex);
}
}
}
```
这里就是继续调用 `org.apache.catalina.startup.Tomcat#start`
```java
public void start() throws LifecycleException {
this.getServer();
this.server.start();
}
```
获取server, `org.apache.catalina.startup.Tomcat#getServer`
```java
public Server getServer() {
if (this.server != null) {
return this.server;
} else {
System.setProperty("catalina.useNaming", "false");
this.server = new StandardServer();
this.initBaseDir();
ConfigFileLoader.setSource(new CatalinaBaseConfigurationSource(new File(this.basedir), (String)null));
this.server.setPort(-1);
Service service = new StandardService();
service.setName("Tomcat");
this.server.addService(service);
return this.server;
}
}

然后就是启动 server,后面可以继续看这个启动 TomcatServer 内部的逻辑

前面讲了怎么获取 mapping url,继续说下这些mappings 是怎么注册进去的,
来看下这个 RequestMappingHandlerMapping 的继承关系

可以看到这个类实现了 org.springframework.beans.factory.InitializingBean 这个接口,然后这个 InitializingBean 提供了 org.springframework.beans.factory.InitializingBean#afterPropertiesSet 接口,可以在 bean 初始化后做一些属性设置等,
这里是调用了类本身的 afterPropertiesSet 方法和父类的

1
2
3
4
5
6
7
8
9
10
11
public void afterPropertiesSet() {
this.config = new RequestMappingInfo.BuilderConfiguration();
this.config.setUrlPathHelper(getUrlPathHelper());
this.config.setPathMatcher(getPathMatcher());
this.config.setSuffixPatternMatch(useSuffixPatternMatch());
this.config.setTrailingSlashMatch(useTrailingSlashMatch());
this.config.setRegisteredSuffixPatternMatch(useRegisteredSuffixPatternMatch());
this.config.setContentNegotiationManager(getContentNegotiationManager());

super.afterPropertiesSet();
}

父类是 org.springframework.web.servlet.handler.AbstractHandlerMethodMapping#afterPropertiesSet
具体代码很简略,就是初始化 HandlerMethod

1
2
3
4
@Override
public void afterPropertiesSet() {
initHandlerMethods();
}

也就是调用了 org.springframework.web.servlet.handler.AbstractHandlerMethodMapping#initHandlerMethods

1
2
3
4
5
6
7
8
protected void initHandlerMethods() {
for (String beanName : getCandidateBeanNames()) {
if (!beanName.startsWith(SCOPED_TARGET_NAME_PREFIX)) {
processCandidateBean(beanName);
}
}
handlerMethodsInitialized(getHandlerMethods());
}

然后就是调用 org.springframework.web.servlet.handler.AbstractHandlerMethodMapping#processCandidateBean

1
2
3
4
5
6
7
8
9
10
11
12
13
14
15
protected void processCandidateBean(String beanName) {
Class<?> beanType = null;
try {
beanType = obtainApplicationContext().getType(beanName);
}
catch (Throwable ex) {
// An unresolvable bean type, probably from a lazy bean - let's ignore it.
if (logger.isTraceEnabled()) {
logger.trace("Could not resolve type for bean '" + beanName + "'", ex);
}
}
if (beanType != null && isHandler(beanType)) {
detectHandlerMethods(beanName);
}
}

先是获取的 beanType,在判断 beanType 是不是 Handler,通过方法 org.springframework.web.servlet.mvc.method.annotation.RequestMappingHandlerMapping#isHandler

1
2
3
4
5
@Override
protected boolean isHandler(Class<?> beanType) {
return (AnnotatedElementUtils.hasAnnotation(beanType, Controller.class) ||
AnnotatedElementUtils.hasAnnotation(beanType, RequestMapping.class));
}

就很简单,判断是不是有 Controller 注解或者 RequestMapping 注解
然后就是判断 HandlerMethod 了,调用了 org.springframework.web.servlet.handler.AbstractHandlerMethodMapping#detectHandlerMethods

1
2
3
4
5
6
7
8
9
10
11
12
13
14
15
16
17
18
19
20
21
22
23
24
25
protected void detectHandlerMethods(Object handler) {
Class<?> handlerType = (handler instanceof String ?
obtainApplicationContext().getType((String) handler) : handler.getClass());

if (handlerType != null) {
Class<?> userType = ClassUtils.getUserClass(handlerType);
Map<Method, T> methods = MethodIntrospector.selectMethods(userType,
(MethodIntrospector.MetadataLookup<T>) method -> {
try {
return getMappingForMethod(method, userType);
}
catch (Throwable ex) {
throw new IllegalStateException("Invalid mapping on handler class [" +
userType.getName() + "]: " + method, ex);
}
});
if (logger.isTraceEnabled()) {
logger.trace(formatMappings(userType, methods));
}
methods.forEach((method, mapping) -> {
Method invocableMethod = AopUtils.selectInvocableMethod(method, userType);
registerHandlerMethod(handler, invocableMethod, mapping);
});
}
}

前面先通过 getMappingForMethod 找出有 Mapping 的方法,

1
2
3
4
5
6
7
8
9
10
11
12
13
14
15
16
@Override
@Nullable
protected RequestMappingInfo getMappingForMethod(Method method, Class<?> handlerType) {
RequestMappingInfo info = createRequestMappingInfo(method);
if (info != null) {
RequestMappingInfo typeInfo = createRequestMappingInfo(handlerType);
if (typeInfo != null) {
info = typeInfo.combine(info);
}
String prefix = getPathPrefix(handlerType);
if (prefix != null) {
info = RequestMappingInfo.paths(prefix).options(this.config).build().combine(info);
}
}
return info;
}
1
2
3
4
5
6
7
@Nullable
private RequestMappingInfo createRequestMappingInfo(AnnotatedElement element) {
RequestMapping requestMapping = AnnotatedElementUtils.findMergedAnnotation(element, RequestMapping.class);
RequestCondition<?> condition = (element instanceof Class ?
getCustomTypeCondition((Class<?>) element) : getCustomMethodCondition((Method) element));
return (requestMapping != null ? createRequestMappingInfo(requestMapping, condition) : null);
}

然后再是对 Method 循环调用 org.springframework.web.servlet.handler.AbstractHandlerMethodMapping#registerHandlerMethod
可以看到就是上一篇的 org.springframework.web.servlet.handler.AbstractHandlerMethodMapping#mappingRegistry 去存储映射信息

1
2
3
protected void registerHandlerMethod(Object handler, Method method, T mapping) {
this.mappingRegistry.register(mapping, handler, method);
}

最后是真的注册逻辑

1
2
3
4
5
6
7
8
9
10
11
12
13
14
15
16
17
18
19
20
21
22
23
24
25
26
27
28
29
30
31
32
33
34
35
36
public void register(T mapping, Object handler, Method method) {
// Assert that the handler method is not a suspending one.
if (KotlinDetector.isKotlinType(method.getDeclaringClass())) {
Class<?>[] parameterTypes = method.getParameterTypes();
if ((parameterTypes.length > 0) && "kotlin.coroutines.Continuation".equals(parameterTypes[parameterTypes.length - 1].getName())) {
throw new IllegalStateException("Unsupported suspending handler method detected: " + method);
}
}
this.readWriteLock.writeLock().lock();
try {
HandlerMethod handlerMethod = createHandlerMethod(handler, method);
validateMethodMapping(handlerMethod, mapping);
this.mappingLookup.put(mapping, handlerMethod);

List<String> directUrls = getDirectUrls(mapping);
for (String url : directUrls) {
this.urlLookup.add(url, mapping);
}

String name = null;
if (getNamingStrategy() != null) {
name = getNamingStrategy().getName(handlerMethod, mapping);
addMappingName(name, handlerMethod);
}

CorsConfiguration corsConfig = initCorsConfiguration(handler, method, mapping);
if (corsConfig != null) {
this.corsLookup.put(handlerMethod, corsConfig);
}

this.registry.put(mapping, new MappingRegistration<>(mapping, handlerMethod, directUrls, name));
}
finally {
this.readWriteLock.writeLock().unlock();
}
}

底层的存储就是上一篇说的 mappingLookup 来存储信息

最近有个小需求,要把我们一个 springboot 应用的 request mapping 给导出来,这么说已经是转化过了的,应该是要整理这个应用所有的接口路径,比如我有一个 api.baidu1.com 作为接口域名,然后这个域名下有很多个接口提供服务,这些接口都是写在一个 springboot 应用里,如果本身有网关管理这些接口转发的其实可以通过网关的数据输出,这里就介绍下通过代码来获取

1
2
3
4
5
6
7
8
RequestMappingHandlerMapping mapping = appContext.getBean(RequestMappingHandlerMapping.class);
Map<RequestMappingInfo, HandlerMethod> map = mapping.getHandlerMethods();
for (Map.Entry<RequestMappingInfo, HandlerMethod> entry : map.entrySet()) {
Set<String> urlSet = entry.getKey().getPatternsCondition().getPatterns();
for (String url : urlSet) {
System.out.println(url);
}
}

第一行

逐行来解析下,第一行就是从上下文中获取 RequestMappingHandlerMapping 这个 bean,

第二行

然后调用了 getHandlerMethods,
这里面具体执行了

1
2
3
4
5
6
7
8
9
public Map<T, HandlerMethod> getHandlerMethods() {
this.mappingRegistry.acquireReadLock();
try {
return Collections.unmodifiableMap(this.mappingRegistry.getMappings());
}
finally {
this.mappingRegistry.releaseReadLock();
}
}

前后加了锁,重要的就是从 mappingRegistry 中获取 mappings, 这里获取的就是
org.springframework.web.servlet.handler.AbstractHandlerMethodMapping.MappingRegistry#getMappings 具体的代码

1
2
3
public Map<T, HandlerMethod> getMappings() {
return this.mappingLookup;
}

而这个 mappingLookup 再来看下

1
2
3
4
5
class MappingRegistry {

private final Map<T, MappingRegistration<T>> registry = new HashMap<>();

private final Map<T, HandlerMethod> mappingLookup = new LinkedHashMap<>();

可以看到就是在 MappingRegistry 中的一个变量,至于这个变量是怎么来的,简单的考虑下 springboot 处理请求的流程,就是从 Mapping 去找到对应的 Handler,所以就需要提前将这个对应关系存到这个变量里,
具体可以看这 org.springframework.web.servlet.handler.AbstractHandlerMethodMapping.MappingRegistry#register

1
2
3
4
5
6
7
8
9
10
11
12
13
public void register(T mapping, Object handler, Method method) {
// Assert that the handler method is not a suspending one.
if (KotlinDetector.isKotlinType(method.getDeclaringClass())) {
Class<?>[] parameterTypes = method.getParameterTypes();
if ((parameterTypes.length > 0) && "kotlin.coroutines.Continuation".equals(parameterTypes[parameterTypes.length - 1].getName())) {
throw new IllegalStateException("Unsupported suspending handler method detected: " + method);
}
}
this.readWriteLock.writeLock().lock();
try {
HandlerMethod handlerMethod = createHandlerMethod(handler, method);
validateMethodMapping(handlerMethod, mapping);
this.mappingLookup.put(mapping, handlerMethod);

就是在这里会把 mapping 和 handleMethod 对应关系存进去

第三行

这里拿的是上面的 map 里的 key,也就是 RequestMappingInfo 也就是 org.springframework.web.servlet.mvc.method.RequestMappingInfo
而真的 url 就存在 org.springframework.web.servlet.mvc.condition.PatternsRequestCondition
最终这里面的patterns就是我们要的路径

1
2
3
4
5
6
public class PatternsRequestCondition extends AbstractRequestCondition<PatternsRequestCondition> {

private final static Set<String> EMPTY_PATH_PATTERN = Collections.singleton("");


private final Set<String> patterns;

写到这下一篇是不是可以介绍下 mapping 的具体注册逻辑

再一次环境部署是发现了个问题,就是在请求微信 https 请求的时候,出现了个错误
No appropriate protocol (protocol is disabled or cipher suites are inappropriate)
一开始以为是环境问题,从 oracle 的 jdk 换成了基于 openjdk 的底包,没有 javax 的关系,
完整的提示包含了 javax 的异常
java.lang.RuntimeException: javax.net.ssl.SSLHandshakeException: No appropriate protocol (protocol is disabled or cipher suites are inappropriate)
后面再看了下,是不是也可能是证书的问题,然后就去找了下是不是证书相关的,
可以看到在 /usr/lib/jvm/java-8-openjdk-amd64/jre/lib/security 路径下的 java.security
jdk.tls.disabledAlgorithms=SSLv3, TLSv1, TLSv1.1, RC4, DES, MD5withRSA,
而正好在我们代码里 createSocketFactory 的时候使用了 TLSv1 这个证书协议

1
2
3
SSLContext sslContext = SSLContext.getInstance("TLS");
sslContext.init(kmf.getKeyManagers(), null, new SecureRandom());
return new SSLConnectionSocketFactory(sslContext, new String[]{"TLSv1"}, null, new DefaultHostnameVerifier());

所以就有两种方案,一个是使用更新版本的 TLS 或者另一个就是使用比较久的 jdk,这也说明其实即使都是 jdk8 的,不同的小版本差异还是会有些影响,有的时候对于这些错误还是需要更深入地学习,不能一概而之认为就是 jdk 用的是 oracle 还是 openjdk 的,不同的错误可能就需要仔细确认原因所在。

0%