Nicksxs's Blog

What hurts more, the pain of hard work or the pain of regret?

前面介绍了 connector,这里边还有个很重要的概念是 Coyote,真正将前面的 connector 跟后面的 container 做了连接,
org.apache.tomcat.util.net.AbstractEndpoint#createSocketProcessor 从这里开始
然后会调用到 org.apache.tomcat.util.net.NioEndpoint#createSocketProcessor

1
2
3
4
5
@Override
protected SocketProcessorBase<NioChannel> createSocketProcessor(
SocketWrapperBase<NioChannel> socketWrapper, SocketEvent event) {
return new SocketProcessor(socketWrapper, event);
}

里面实际的是 new 了
org.apache.tomcat.util.net.NioEndpoint.SocketProcessor#SocketProcessor

1
2
3
4
5
6
7
8
9
10
11
12
13
14
15
16
17
18
19
protected class SocketProcessor extends SocketProcessorBase<NioChannel> {

public SocketProcessor(SocketWrapperBase<NioChannel> socketWrapper, SocketEvent event) {
super(socketWrapper, event);
}

@Override
protected void doRun() {
/*
* Do not cache and re-use the value of socketWrapper.getSocket() in
* this method. If the socket closes the value will be updated to
* CLOSED_NIO_CHANNEL and the previous value potentially re-used for
* a new connection. That can result in a stale cached value which
* in turn can result in unintentionally closing currently active
* connections.
*/
Poller poller = NioEndpoint.this.poller;
if (poller == null) {
socketWrapper.close();

然后是 org.apache.tomcat.util.net.NioEndpoint.SocketProcessor#doRun 这里开始运行

1
2
3
4
5
6
7
8
9
10
11
12
13
14
15
16
17
18
19
20
21
22
23
24
25
26
27
28
29
30
31
32
33
34
35
36
37
38
39
40
41
42
43
44
45
46
47
48
49
50
51
52
53
54
55
56
57
protected void doRun() {
/*
* Do not cache and re-use the value of socketWrapper.getSocket() in
* this method. If the socket closes the value will be updated to
* CLOSED_NIO_CHANNEL and the previous value potentially re-used for
* a new connection. That can result in a stale cached value which
* in turn can result in unintentionally closing currently active
* connections.
*/
Poller poller = NioEndpoint.this.poller;
if (poller == null) {
socketWrapper.close();
return;
}

try {
int handshake = -1;
try {
if (socketWrapper.getSocket().isHandshakeComplete()) {
// No TLS handshaking required. Let the handler
// process this socket / event combination.
handshake = 0;
} else if (event == SocketEvent.STOP || event == SocketEvent.DISCONNECT ||
event == SocketEvent.ERROR) {
// Unable to complete the TLS handshake. Treat it as
// if the handshake failed.
handshake = -1;
} else {
handshake = socketWrapper.getSocket().handshake(event == SocketEvent.OPEN_READ, event == SocketEvent.OPEN_WRITE);
// The handshake process reads/writes from/to the
// socket. status may therefore be OPEN_WRITE once
// the handshake completes. However, the handshake
// happens when the socket is opened so the status
// must always be OPEN_READ after it completes. It
// is OK to always set this as it is only used if
// the handshake completes.
event = SocketEvent.OPEN_READ;
}
} catch (IOException x) {
handshake = -1;
if (log.isDebugEnabled()) {
log.debug("Error during SSL handshake",x);
}
} catch (CancelledKeyException ckx) {
handshake = -1;
}
if (handshake == 0) {
SocketState state = SocketState.OPEN;
// Process the request from this socket
if (event == null) {
state = getHandler().process(socketWrapper, SocketEvent.OPEN_READ);
} else {
state = getHandler().process(socketWrapper, event);
}
if (state == SocketState.CLOSED) {
poller.cancelledKey(getSelectionKey(), socketWrapper);
}

org.apache.coyote.AbstractProtocol.ConnectionHandler#process 这个 getHandler 是哪个呢

1
2
3
4
5
6
7
public AbstractHttp11Protocol(AbstractEndpoint<S,?> endpoint) {
super(endpoint);
setConnectionTimeout(Constants.DEFAULT_CONNECTION_TIMEOUT);
ConnectionHandler<S> cHandler = new ConnectionHandler<>(this);
setHandler(cHandler);
getEndpoint().setHandler(cHandler);
}

上面补充下这个 Handler,帮助后面的理解,而这个 connectionHandler 则是实现了 AbstractEndpoint.Handler

1
2
3
4
5
6
7
8
9
10
11
12
13
14
protected static class ConnectionHandler<S> implements AbstractEndpoint.Handler<S> {

private final AbstractProtocol<S> proto;
private final RequestGroupInfo global = new RequestGroupInfo();
private final AtomicLong registerCount = new AtomicLong(0);
private final RecycledProcessors recycledProcessors = new RecycledProcessors(this);

public ConnectionHandler(AbstractProtocol<S> proto) {
this.proto = proto;
}

protected AbstractProtocol<S> getProtocol() {
return proto;
}

然后会继续寻找真实的 Processer

1
2
3
4
5
6
7
8
9
10
11
12
13
14
15
16
17
18
19
20
21
22
23
24
25
26
27
@Override
public SocketState process(SocketWrapperBase<S> wrapper, SocketEvent status) {
if (getLog().isDebugEnabled()) {
getLog().debug(sm.getString("abstractConnectionHandler.process",
wrapper.getSocket(), status));
}
if (wrapper == null) {
// Nothing to do. Socket has been closed.
return SocketState.CLOSED;
}

S socket = wrapper.getSocket();

Processor processor = (Processor) wrapper.getCurrentProcessor();
if (getLog().isDebugEnabled()) {
getLog().debug(sm.getString("abstractConnectionHandler.connectionsGet",
processor, socket));
}
// 省略代码
// 直到这里创建 processor
if (processor == null) {
processor = getProtocol().createProcessor();
register(processor);
if (getLog().isDebugEnabled()) {
getLog().debug(sm.getString("abstractConnectionHandler.processorCreate", processor));
}
}

也就是 org.apache.coyote.http11.AbstractHttp11Protocol#createProcessor

1
2
3
4
5
@Override
protected Processor createProcessor() {
Http11Processor processor = new Http11Processor(this, adapter);
return processor;
}

再往后就是调用 process 方法了,然后它是 Http11Processor 的抽象父类
org.apache.coyote.AbstractProcessorLight
会调用 org.apache.coyote.AbstractProcessorLight#process 来处理前面说的 socket
接着会跑到这

1
2
3
4
5
6
7
8
9
10
11
12
13
14
15
16
17
18
19
20
21
22
23
24
25
26
@Override
public SocketState process(SocketWrapperBase<?> socketWrapper, SocketEvent status)
throws IOException {

SocketState state = SocketState.CLOSED;
Iterator<DispatchType> dispatches = null;
do {
if (dispatches != null) {
DispatchType nextDispatch = dispatches.next();
if (getLog().isDebugEnabled()) {
getLog().debug("Processing dispatch type: [" + nextDispatch + "]");
}
state = dispatch(nextDispatch.getSocketStatus());
if (!dispatches.hasNext()) {
state = checkForPipelinedData(state, socketWrapper);
}
} else if (status == SocketEvent.DISCONNECT) {
// Do nothing here, just wait for it to get recycled
} else if (isAsync() || isUpgrade() || state == SocketState.ASYNC_END) {
state = dispatch(status);
state = checkForPipelinedData(state, socketWrapper);
} else if (status == SocketEvent.OPEN_WRITE) {
// Extra write event likely after async, ignore
state = SocketState.LONG;
} else if (status == SocketEvent.OPEN_READ) {
state = service(socketWrapper);

接下去就是
org.apache.coyote.http11.Http11Processor#service
再就是调用coyote的 service 方法也就是 org.apache.catalina.connector.CoyoteAdapter#service
这里就会调用到

1
2
3
4

connector.getService().getContainer().getPipeline().getFirst().invoke(
request, response);

然后进行 valve 串的执行到 org.apache.catalina.core.StandardWrapperValve#invoke
会调用

1
2
filterChain.doFilter
(request.getRequest(), response.getResponse());

就会执行 filter 链
最后到
org.apache.catalina.core.ApplicationFilterChain#internalDoFilter

1
servlet.service(request, response);

就到了 DispatcherServlet 处理的流程, 这样就和之前介绍 DispatcherServlet开始的请求处理接上了。

前面那一篇感觉上来的有点突兀,还是应该按照架构去慢慢解析,所以这里回归下我们整体的 Tomcat 架构,这里我们通过一个 Tomcat 的配置文件来看看

1
2
3
4
5
6
7
8
9
10
11
<Server>
<Service>
<Connector />
<Connector />
<Engine>
<Host>
<Context />
</Host>
</Engine>
</Service>
</Server>

上次我们讲解了 connector,也提到了初始化的流程,在
org.springframework.boot.web.embedded.tomcat.TomcatServletWebServerFactory#getWebServer
代码中我们就能略窥一斑,

1
2
3
4
5
6
7
8
9
10
Tomcat tomcat = new Tomcat();
File baseDir = this.baseDirectory != null ? this.baseDirectory : this.createTempDir("tomcat");
tomcat.setBaseDir(baseDir.getAbsolutePath());
Connector connector = new Connector(this.protocol);
connector.setThrowOnFailure(true);
tomcat.getService().addConnector(connector);
this.customizeConnector(connector);
tomcat.setConnector(connector);
tomcat.getHost().setAutoDeploy(false);
this.configureEngine(tomcat.getEngine());

这里的 connector 是在 service 中的,而
tomcat.getService().addConnector(connector); 这一行
具体来看下

1
2
3
public Service getService() {
return getServer().findServices()[0];
}

又调用了,org.apache.catalina.startup.Tomcat#getServer

1
2
3
4
5
6
7
8
9
10
11
12
13
14
15
16
17
18
19
20
21
22
public Server getServer() {

if (server != null) {
return server;
}

System.setProperty("catalina.useNaming", "false");

server = new StandardServer();

initBaseDir();

// Set configuration source
ConfigFileLoader.setSource(new CatalinaBaseConfigurationSource(new File(basedir), null));

server.setPort( -1 );

Service service = new StandardService();
service.setName("Tomcat");
server.addService(service);
return server;
}

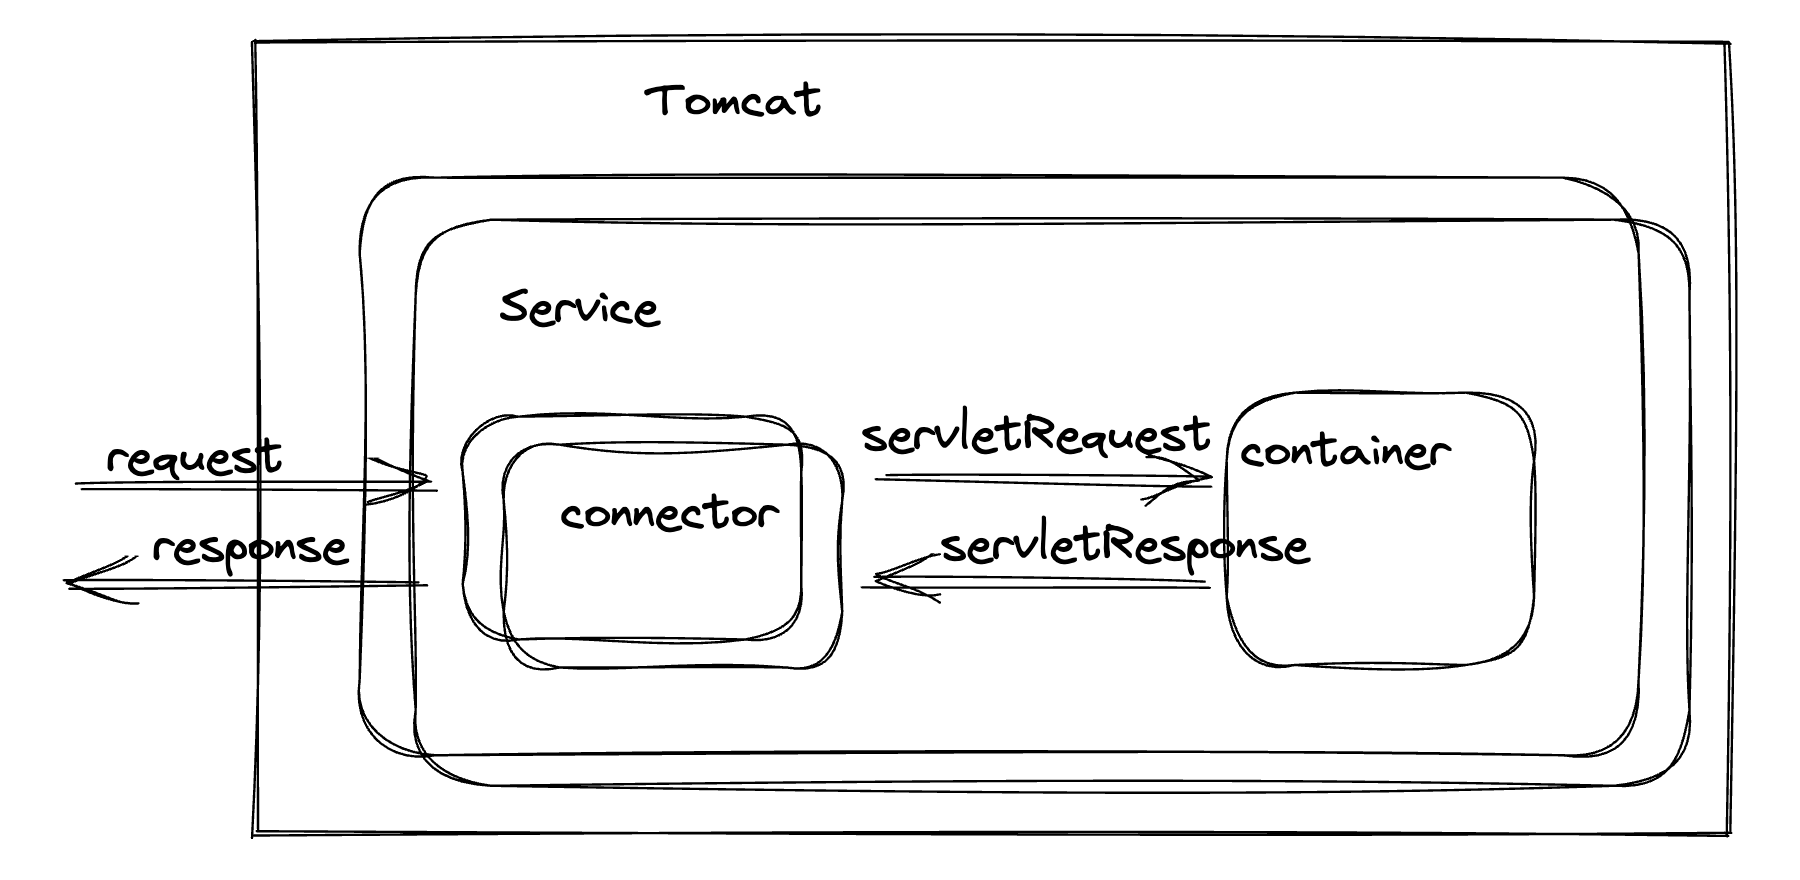
可以看到,先 new 了 StandardServer,再 new 了 StandardService,可以理解为创建 Server 后具体是由 service 进行服务,
而在 service 中就是上面的配置文件里显示的,service 包含了 connector,可以是多个connector,负责接入,具体内容可以参看上一篇
而后是 Engine,Engine 的关系是一个 Service 有一个 Engine,Engine 负责处理真正的逻辑,

1
2
3
4
5
6
7
8
9
10
11
12
public Engine getEngine() {
Service service = getServer().findServices()[0];
if (service.getContainer() != null) {
return service.getContainer();
}
Engine engine = new StandardEngine();
engine.setName( "Tomcat" );
engine.setDefaultHost(hostname);
engine.setRealm(createDefaultRealm());
service.setContainer(engine);
return engine;
}

Engine 一般默认我们初始化的都是 StandardEngine,包括前面的 StandardServer 和StandardService,
而对于 host 来说,Engine 中可以包含多个 host,也就是可以处理多个虚拟主机的业务逻辑,

1
2
3
4
5
6
7
8
9
10
11
public Host getHost() {
Engine engine = getEngine();
if (engine.findChildren().length > 0) {
return (Host) engine.findChildren()[0];
}

Host host = new StandardHost();
host.setName(hostname);
getEngine().addChild(host);
return host;
}

tomcat的特点也都是常规的懒加载,在 get 的第一次请求里进行初始化,这边同样创建了 StandardHost,对于可以有多个的 host,在 Engine 中添加也变成了addChild,而对于常规的 Tomcat 来说,往下一层就是 context 了,这个可以支持多个 web 应用,所以也是可以添加多个 context,但我这边以 springboot 嵌入的 Tomcat 举例,他是内嵌的 context

1
2
3
4
5
6
7
8
9
10
11
12
13
14
15
16
17
18
19
20
21
22
23
24
25
26
27
28
29
30
31
32
33
34
35
36
37
38
39
40
41
42
protected void prepareContext(Host host, ServletContextInitializer[] initializers) {
File documentRoot = this.getValidDocumentRoot();
TomcatEmbeddedContext context = new TomcatEmbeddedContext();
if (documentRoot != null) {
context.setResources(new LoaderHidingResourceRoot(context));
}

context.setName(this.getContextPath());
context.setDisplayName(this.getDisplayName());
context.setPath(this.getContextPath());
File docBase = documentRoot != null ? documentRoot : this.createTempDir("tomcat-docbase");
context.setDocBase(docBase.getAbsolutePath());
context.addLifecycleListener(new Tomcat.FixContextListener());
context.setParentClassLoader(this.resourceLoader != null ? this.resourceLoader.getClassLoader() : ClassUtils.getDefaultClassLoader());
this.resetDefaultLocaleMapping(context);
this.addLocaleMappings(context);

try {
context.setCreateUploadTargets(true);
} catch (NoSuchMethodError var8) {
}

this.configureTldPatterns(context);
WebappLoader loader = new WebappLoader();
loader.setLoaderClass(TomcatEmbeddedWebappClassLoader.class.getName());
loader.setDelegate(true);
context.setLoader(loader);
if (this.isRegisterDefaultServlet()) {
this.addDefaultServlet(context);
}

if (this.shouldRegisterJspServlet()) {
this.addJspServlet(context);
this.addJasperInitializer(context);
}

context.addLifecycleListener(new StaticResourceConfigurer(context));
ServletContextInitializer[] initializersToUse = this.mergeInitializers(initializers);
host.addChild(context);
this.configureContext(context, initializersToUse);
this.postProcessContext(context);
}

是一个 TomcatEmbeddedContext,这一点比较特殊,希望这样会有个一个大致的概念。

tomcat的主体架构里,connector 作为核心的连接器

这也是个架构的优化,将连接跟请求处理分开,可以适配各种连接协议
连接器的初始化逻辑,是在初始化 WebServer 的时候调用
org.springframework.boot.web.embedded.tomcat.TomcatServletWebServerFactory#getWebServer

1
2
3
4
5
6
7
8
9
10
11
12
13
14
public WebServer getWebServer(ServletContextInitializer... initializers) {
if (this.disableMBeanRegistry) {
Registry.disableRegistry();
}

Tomcat tomcat = new Tomcat();
File baseDir = this.baseDirectory != null ? this.baseDirectory : this.createTempDir("tomcat");
tomcat.setBaseDir(baseDir.getAbsolutePath());
// 这里就是创建 Connector
Connector connector = new Connector(this.protocol);
connector.setThrowOnFailure(true);
tomcat.getService().addConnector(connector);
this.customizeConnector(connector);
tomcat.setConnector(connector);

而 connector 中最重要的就是 ProtocolHandler ,初始化代码中
org.apache.catalina.connector.Connector#Connector(java.lang.String)

1
2
3
4
5
6
7
8
9
10
11
12
13
14
15
16
17
18
19
20
public Connector(String protocol) {
boolean apr = AprStatus.getUseAprConnector() && AprStatus.isInstanceCreated()
&& AprLifecycleListener.isAprAvailable();
ProtocolHandler p = null;
try {
p = ProtocolHandler.create(protocol, apr);
} catch (Exception e) {
log.error(sm.getString(
"coyoteConnector.protocolHandlerInstantiationFailed"), e);
}
if (p != null) {
protocolHandler = p;
protocolHandlerClassName = protocolHandler.getClass().getName();
} else {
protocolHandler = null;
protocolHandlerClassName = protocol;
}
// Default for Connector depends on this system property
setThrowOnFailure(Boolean.getBoolean("org.apache.catalina.startup.EXIT_ON_INIT_FAILURE"));
}

这里就调用了
org.apache.coyote.ProtocolHandler#create
根据协议来生成对应的,我们这里默认就是
org.apache.coyote.http11.Http11NioProtocol

1
2
3
4
5
6
7
8
9
10
11
12
13
14
15
16
17
18
19
20
21
22
23
24
25
public static ProtocolHandler create(String protocol, boolean apr)
throws ClassNotFoundException, InstantiationException, IllegalAccessException,
IllegalArgumentException, InvocationTargetException, NoSuchMethodException, SecurityException {
if (protocol == null || "HTTP/1.1".equals(protocol)
|| (!apr && org.apache.coyote.http11.Http11NioProtocol.class.getName().equals(protocol))
|| (apr && org.apache.coyote.http11.Http11AprProtocol.class.getName().equals(protocol))) {
if (apr) {
return new org.apache.coyote.http11.Http11AprProtocol();
} else {
return new org.apache.coyote.http11.Http11NioProtocol();
}
} else if ("AJP/1.3".equals(protocol)
|| (!apr && org.apache.coyote.ajp.AjpNioProtocol.class.getName().equals(protocol))
|| (apr && org.apache.coyote.ajp.AjpAprProtocol.class.getName().equals(protocol))) {
if (apr) {
return new org.apache.coyote.ajp.AjpAprProtocol();
} else {
return new org.apache.coyote.ajp.AjpNioProtocol();
}
} else {
// Instantiate protocol handler
Class<?> clazz = Class.forName(protocol);
return (ProtocolHandler) clazz.getConstructor().newInstance();
}
}

而这个初始化就主要做的是初始化 EndPoint

1
2
3
public Http11NioProtocol() {
super(new NioEndpoint());
}

这个调用父类的方法是调用的
org.apache.coyote.http11.AbstractHttp11Protocol#AbstractHttp11Protocol

1
2
3
4
5
6
7
public AbstractHttp11Protocol(AbstractEndpoint<S,?> endpoint) {
super(endpoint);
setConnectionTimeout(Constants.DEFAULT_CONNECTION_TIMEOUT);
ConnectionHandler<S> cHandler = new ConnectionHandler<>(this);
setHandler(cHandler);
getEndpoint().setHandler(cHandler);
}

而后在 Tomcat 启动后,在启动 connector 的时候
是在StandardService 添加 connector 时,启动了 connector
org.apache.catalina.core.StandardService#addConnector

1
2
3
4
5
6
7
8
9
10
11
12
13
14
15
16
17
18
19
20
21
22
23
@Override
public void addConnector(Connector connector) {

synchronized (connectorsLock) {
connector.setService(this);
Connector results[] = new Connector[connectors.length + 1];
System.arraycopy(connectors, 0, results, 0, connectors.length);
results[connectors.length] = connector;
connectors = results;
}

try {
if (getState().isAvailable()) {
connector.start();
}
} catch (LifecycleException e) {
throw new IllegalArgumentException(
sm.getString("standardService.connector.startFailed", connector), e);
}

// Report this property change to interested listeners
support.firePropertyChange("connector", null, connector);
}

而后就会调用到 ConnectorinitInternal 方法
org.apache.catalina.connector.Connector#initInternal

1
2
3
4
5
6
7
8
9
10
11
12
13
14
15
16
17
18
19
20
21
22
23
24
25
26
27
28
29
30
31
32
33
34
35
36
37
38
39
40
41
42
43
44
45
46
47
48
@Override
protected void initInternal() throws LifecycleException {

super.initInternal();

if (protocolHandler == null) {
throw new LifecycleException(
sm.getString("coyoteConnector.protocolHandlerInstantiationFailed"));
}

// Initialize adapter
adapter = new CoyoteAdapter(this);
protocolHandler.setAdapter(adapter);
if (service != null) {
protocolHandler.setUtilityExecutor(service.getServer().getUtilityExecutor());
}

// Make sure parseBodyMethodsSet has a default
if (null == parseBodyMethodsSet) {
setParseBodyMethods(getParseBodyMethods());
}

if (protocolHandler.isAprRequired() && !AprStatus.isInstanceCreated()) {
throw new LifecycleException(sm.getString("coyoteConnector.protocolHandlerNoAprListener",
getProtocolHandlerClassName()));
}
if (protocolHandler.isAprRequired() && !AprStatus.isAprAvailable()) {
throw new LifecycleException(sm.getString("coyoteConnector.protocolHandlerNoAprLibrary",
getProtocolHandlerClassName()));
}
if (AprStatus.isAprAvailable() && AprStatus.getUseOpenSSL() &&
protocolHandler instanceof AbstractHttp11JsseProtocol) {
AbstractHttp11JsseProtocol<?> jsseProtocolHandler =
(AbstractHttp11JsseProtocol<?>) protocolHandler;
if (jsseProtocolHandler.isSSLEnabled() &&
jsseProtocolHandler.getSslImplementationName() == null) {
// OpenSSL is compatible with the JSSE configuration, so use it if APR is available
jsseProtocolHandler.setSslImplementationName(OpenSSLImplementation.class.getName());
}
}

try {
protocolHandler.init();
} catch (Exception e) {
throw new LifecycleException(
sm.getString("coyoteConnector.protocolHandlerInitializationFailed"), e);
}
}

这里继续往下走就是 protocolHandler 的 init 方法

1
2
3
4
5
6
7
8
9
10
11
12
13
14
15
16
17
18
19
20
21
22
23
24
25
26
27
28
@Override
public void init() throws Exception {
if (getLog().isInfoEnabled()) {
getLog().info(sm.getString("abstractProtocolHandler.init", getName()));
logPortOffset();
}

if (oname == null) {
// Component not pre-registered so register it
oname = createObjectName();
if (oname != null) {
Registry.getRegistry(null, null).registerComponent(this, oname, null);
}
}

if (this.domain != null) {
ObjectName rgOname = new ObjectName(domain + ":type=GlobalRequestProcessor,name=" + getName());
this.rgOname = rgOname;
Registry.getRegistry(null, null).registerComponent(
getHandler().getGlobal(), rgOname, null);
}

String endpointName = getName();
endpoint.setName(endpointName.substring(1, endpointName.length()-1));
endpoint.setDomain(domain);

endpoint.init();
}

看一下继承关系

然后就看到这里调用了 endpoint.init() ,走的也是父类的初始化方法,
org.apache.tomcat.util.net.AbstractEndpoint#init

1
2
3
4
5
6
7
8
9
10
11
12
13
14
15
16
17
18
19
20
public final void init() throws Exception {
if (bindOnInit) {
bindWithCleanup();
bindState = BindState.BOUND_ON_INIT;
}
if (this.domain != null) {
// Register endpoint (as ThreadPool - historical name)
oname = new ObjectName(domain + ":type=ThreadPool,name=\"" + getName() + "\"");
Registry.getRegistry(null, null).registerComponent(this, oname, null);

ObjectName socketPropertiesOname = new ObjectName(domain +
":type=SocketProperties,name=\"" + getName() + "\"");
socketProperties.setObjectName(socketPropertiesOname);
Registry.getRegistry(null, null).registerComponent(socketProperties, socketPropertiesOname, null);

for (SSLHostConfig sslHostConfig : findSslHostConfigs()) {
registerJmx(sslHostConfig);
}
}
}

然后接着调用了
org.apache.tomcat.util.net.AbstractEndpoint#bindWithCleanup

1
2
3
4
5
6
7
8
9
10
11
private void bindWithCleanup() throws Exception {
try {
bind();
} catch (Throwable t) {
// Ensure open sockets etc. are cleaned up if something goes
// wrong during bind
ExceptionUtils.handleThrowable(t);
unbind();
throw t;
}
}

这里的 bind 方法调用的是
org.apache.tomcat.util.net.NioEndpoint#bind

1
2
3
4
5
6
7
8
9
@Override
public void bind() throws Exception {
initServerSocket();

setStopLatch(new CountDownLatch(1));

// Initialize SSL if needed
initialiseSsl();
}

这里的 initServerSocket是后面抽出来的,方便扩展,主要就是开启 ServerSocketChannel,绑定端口

1
2
3
4
5
6
7
8
9
10
11
12
13
14
15
16
17
18
19
20
21
22
23
24
25
26
27
28
29
30
31
32
33
34
35
36
37
38
39
40
41
// Separated out to make it easier for folks that extend NioEndpoint to
// implement custom [server]sockets
protected void initServerSocket() throws Exception {
if (getUseInheritedChannel()) {
// Retrieve the channel provided by the OS
Channel ic = System.inheritedChannel();
if (ic instanceof ServerSocketChannel) {
serverSock = (ServerSocketChannel) ic;
}
if (serverSock == null) {
throw new IllegalArgumentException(sm.getString("endpoint.init.bind.inherited"));
}
} else if (getUnixDomainSocketPath() != null) {
SocketAddress sa = JreCompat.getInstance().getUnixDomainSocketAddress(getUnixDomainSocketPath());
serverSock = JreCompat.getInstance().openUnixDomainServerSocketChannel();
serverSock.bind(sa, getAcceptCount());
if (getUnixDomainSocketPathPermissions() != null) {
Path path = Paths.get(getUnixDomainSocketPath());
Set<PosixFilePermission> permissions =
PosixFilePermissions.fromString(getUnixDomainSocketPathPermissions());
if (path.getFileSystem().supportedFileAttributeViews().contains("posix")) {
FileAttribute<Set<PosixFilePermission>> attrs = PosixFilePermissions.asFileAttribute(permissions);
Files.setAttribute(path, attrs.name(), attrs.value());
} else {
java.io.File file = path.toFile();
if (permissions.contains(PosixFilePermission.OTHERS_READ) && !file.setReadable(true, false)) {
log.warn(sm.getString("endpoint.nio.perms.readFail", file.getPath()));
}
if (permissions.contains(PosixFilePermission.OTHERS_WRITE) && !file.setWritable(true, false)) {
log.warn(sm.getString("endpoint.nio.perms.writeFail", file.getPath()));
}
}
}
} else {
serverSock = ServerSocketChannel.open();
socketProperties.setProperties(serverSock.socket());
InetSocketAddress addr = new InetSocketAddress(getAddress(), getPortWithOffset());
serverSock.bind(addr, getAcceptCount());
}
serverSock.configureBlocking(true); //mimic APR behavior
}

接着我们来看下 start 方法,这里多数是复用的 父类的方法
org.apache.tomcat.util.net.AbstractEndpoint#start

1
2
3
4
5
6
7
public final void start() throws Exception {
if (bindState == BindState.UNBOUND) {
bindWithCleanup();
bindState = BindState.BOUND_ON_START;
}
startInternal();
}

startInternal 才是 NioEndPoint 中的处理

1
2
3
4
5
6
7
8
9
10
11
12
13
14
15
16
17
18
19
20
21
22
23
24
25
26
27
28
29
30
31
32
33
34
35
36
37
38
39
40
/**
* Start the NIO endpoint, creating acceptor, poller threads.
*/
@Override
public void startInternal() throws Exception {

if (!running) {
running = true;
paused = false;

if (socketProperties.getProcessorCache() != 0) {
processorCache = new SynchronizedStack<>(SynchronizedStack.DEFAULT_SIZE,
socketProperties.getProcessorCache());
}
if (socketProperties.getEventCache() != 0) {
eventCache = new SynchronizedStack<>(SynchronizedStack.DEFAULT_SIZE,
socketProperties.getEventCache());
}
if (socketProperties.getBufferPool() != 0) {
nioChannels = new SynchronizedStack<>(SynchronizedStack.DEFAULT_SIZE,
socketProperties.getBufferPool());
}

// Create worker collection
if (getExecutor() == null) {
createExecutor();
}

initializeConnectionLatch();

// Start poller thread
poller = new Poller();
Thread pollerThread = new Thread(poller, getName() + "-Poller");
pollerThread.setPriority(threadPriority);
pollerThread.setDaemon(true);
pollerThread.start();

startAcceptorThread();
}
}

上面是启动了一个 Poller 线程,在startAcceptorThread 里是启动了 acceptor

1
2
3
4
5
6
7
8
9
protected void startAcceptorThread() {
acceptor = new Acceptor<>(this);
String threadName = getName() + "-Acceptor";
acceptor.setThreadName(threadName);
Thread t = new Thread(acceptor, threadName);
t.setPriority(getAcceptorThreadPriority());
t.setDaemon(getDaemon());
t.start();
}

启动后运行的代码

1
2
3
4
5
6
7
8
9
10
11
12
13
14
15
16
17
18
19
20
21
22
23
24
25
26
27
28
29
30
31
32
33
34
35
36
37
38
39
40
41
42
43
44
45
46
47
48
49
50
51
52
53
54
55
56
57
58
59
60
61
62
63
64
65
66
67
68
69
70
71
72
73
74
75
76
77
78
79
80
81
82
83
84
85
86
87
88
89
@Override
public void run() {

int errorDelay = 0;

try {
// Loop until we receive a shutdown command
while (!stopCalled) {

// Loop if endpoint is paused
while (endpoint.isPaused() && !stopCalled) {
state = AcceptorState.PAUSED;
try {
Thread.sleep(50);
} catch (InterruptedException e) {
// Ignore
}
}

if (stopCalled) {
break;
}
state = AcceptorState.RUNNING;

try {
//if we have reached max connections, wait
endpoint.countUpOrAwaitConnection();

// Endpoint might have been paused while waiting for latch
// If that is the case, don't accept new connections
if (endpoint.isPaused()) {
continue;
}

U socket = null;
try {
// Accept the next incoming connection from the server
// socket
socket = endpoint.serverSocketAccept();
} catch (Exception ioe) {
// We didn't get a socket
endpoint.countDownConnection();
if (endpoint.isRunning()) {
// Introduce delay if necessary
errorDelay = handleExceptionWithDelay(errorDelay);
// re-throw
throw ioe;
} else {
break;
}
}
// Successful accept, reset the error delay
errorDelay = 0;

// Configure the socket
if (!stopCalled && !endpoint.isPaused()) {
// setSocketOptions() will hand the socket off to
// an appropriate processor if successful
if (!endpoint.setSocketOptions(socket)) {
endpoint.closeSocket(socket);
}
} else {
endpoint.destroySocket(socket);
}
} catch (Throwable t) {
ExceptionUtils.handleThrowable(t);
String msg = sm.getString("endpoint.accept.fail");
// APR specific.
// Could push this down but not sure it is worth the trouble.
if (t instanceof Error) {
Error e = (Error) t;
if (e.getError() == 233) {
// Not an error on HP-UX so log as a warning
// so it can be filtered out on that platform
// See bug 50273
log.warn(msg, t);
} else {
log.error(msg, t);
}
} else {
log.error(msg, t);
}
}
}
} finally {
stopLatch.countDown();
}
state = AcceptorState.ENDED;
}

这行socket = endpoint.serverSocketAccept();是 accept 等待线程进来,进来以后调用

1
2
3
4
5
6
7
8
9
10
11
12
13
14
15
16
17
18
19
20
21
22
23
24
25
26
27
28
29
30
31
32
33
34
35
36
37
38
39
40
41
42
43
44
45
46
47
48
49
50
51
@Override
protected boolean setSocketOptions(SocketChannel socket) {
NioSocketWrapper socketWrapper = null;
try {
// Allocate channel and wrapper
NioChannel channel = null;
if (nioChannels != null) {
channel = nioChannels.pop();
}
if (channel == null) {
SocketBufferHandler bufhandler = new SocketBufferHandler(
socketProperties.getAppReadBufSize(),
socketProperties.getAppWriteBufSize(),
socketProperties.getDirectBuffer());
if (isSSLEnabled()) {
channel = new SecureNioChannel(bufhandler, this);
} else {
channel = new NioChannel(bufhandler);
}
}
NioSocketWrapper newWrapper = new NioSocketWrapper(channel, this);
channel.reset(socket, newWrapper);
connections.put(socket, newWrapper);
socketWrapper = newWrapper;

// Set socket properties
// Disable blocking, polling will be used
socket.configureBlocking(false);
if (getUnixDomainSocketPath() == null) {
socketProperties.setProperties(socket.socket());
}

socketWrapper.setReadTimeout(getConnectionTimeout());
socketWrapper.setWriteTimeout(getConnectionTimeout());
socketWrapper.setKeepAliveLeft(NioEndpoint.this.getMaxKeepAliveRequests());
poller.register(socketWrapper);
return true;
} catch (Throwable t) {
ExceptionUtils.handleThrowable(t);
try {
log.error(sm.getString("endpoint.socketOptionsError"), t);
} catch (Throwable tt) {
ExceptionUtils.handleThrowable(tt);
}
if (socketWrapper == null) {
destroySocket(socket);
}
}
// Tell to close the socket if needed
return false;
}

这里就是最重要的封装了 NioSocketWrapper, 然后注册到 Poller,
我们再来看 Poller 代码,注册其实是添加事件 event

1
2
3
4
5
6
7
8
9
10
11
12
13
public void register(final NioSocketWrapper socketWrapper) {
socketWrapper.interestOps(SelectionKey.OP_READ);//this is what OP_REGISTER turns into.
PollerEvent event = null;
if (eventCache != null) {
event = eventCache.pop();
}
if (event == null) {
event = new PollerEvent(socketWrapper, OP_REGISTER);
} else {
event.reset(socketWrapper, OP_REGISTER);
}
addEvent(event);
}

然后Poller 的运行方法会处理这些 event

1
2
3
4
5
6
7
8
9
10
11
12
13
14
15
16
17
18
19
20
21
22
23
24
25
26
27
28
29
30
31
32
33
34
35
36
37
38
39
40
41
42
43
44
45
46
47
48
49
50
51
52
53
54
55
56
57
58
59
60
@Override
public void run() {
// Loop until destroy() is called
while (true) {

boolean hasEvents = false;

try {
if (!close) {
hasEvents = events();
if (wakeupCounter.getAndSet(-1) > 0) {
// If we are here, means we have other stuff to do
// Do a non blocking select
keyCount = selector.selectNow();
} else {
keyCount = selector.select(selectorTimeout);
}
wakeupCounter.set(0);
}
if (close) {
events();
timeout(0, false);
try {
selector.close();
} catch (IOException ioe) {
log.error(sm.getString("endpoint.nio.selectorCloseFail"), ioe);
}
break;
}
// Either we timed out or we woke up, process events first
if (keyCount == 0) {
hasEvents = (hasEvents | events());
}
} catch (Throwable x) {
ExceptionUtils.handleThrowable(x);
log.error(sm.getString("endpoint.nio.selectorLoopError"), x);
continue;
}

Iterator<SelectionKey> iterator =
keyCount > 0 ? selector.selectedKeys().iterator() : null;
// Walk through the collection of ready keys and dispatch
// any active event.
while (iterator != null && iterator.hasNext()) {
SelectionKey sk = iterator.next();
iterator.remove();
NioSocketWrapper socketWrapper = (NioSocketWrapper) sk.attachment();
// Attachment may be null if another thread has called
// cancelledKey()
if (socketWrapper != null) {
processKey(sk, socketWrapper);
}
}

// Process timeouts
timeout(keyCount,hasEvents);
}

getStopLatch().countDown();
}

如果 events 方法返回了 true 代表有事件,就会跑到processKey(sk, socketWrapper); 来处理这个事件
而这里的 processKey 也比较复杂,

1
2
3
4
5
6
7
8
9
10
11
12
13
14
15
16
17
18
19
20
21
22
23
24
25
26
27
28
29
30
31
32
33
34
35
36
37
38
39
40
41
42
43
44
45
46
47
48
49
50
51
52
53
54
55
56
protected void processKey(SelectionKey sk, NioSocketWrapper socketWrapper) {
try {
if (close) {
cancelledKey(sk, socketWrapper);
} else if (sk.isValid()) {
if (sk.isReadable() || sk.isWritable()) {
if (socketWrapper.getSendfileData() != null) {
processSendfile(sk, socketWrapper, false);
} else {
unreg(sk, socketWrapper, sk.readyOps());
boolean closeSocket = false;
// Read goes before write
if (sk.isReadable()) {
if (socketWrapper.readOperation != null) {
if (!socketWrapper.readOperation.process()) {
closeSocket = true;
}
} else if (socketWrapper.readBlocking) {
synchronized (socketWrapper.readLock) {
socketWrapper.readBlocking = false;
socketWrapper.readLock.notify();
}
} else if (!processSocket(socketWrapper, SocketEvent.OPEN_READ, true)) {
closeSocket = true;
}
}
if (!closeSocket && sk.isWritable()) {
if (socketWrapper.writeOperation != null) {
if (!socketWrapper.writeOperation.process()) {
closeSocket = true;
}
} else if (socketWrapper.writeBlocking) {
synchronized (socketWrapper.writeLock) {
socketWrapper.writeBlocking = false;
socketWrapper.writeLock.notify();
}
} else if (!processSocket(socketWrapper, SocketEvent.OPEN_WRITE, true)) {
closeSocket = true;
}
}
if (closeSocket) {
cancelledKey(sk, socketWrapper);
}
}
}
} else {
// Invalid key
cancelledKey(sk, socketWrapper);
}
} catch (CancelledKeyException ckx) {
cancelledKey(sk, socketWrapper);
} catch (Throwable t) {
ExceptionUtils.handleThrowable(t);
log.error(sm.getString("endpoint.nio.keyProcessingError"), t);
}
}

正常请求回到这
else if (!processSocket(socketWrapper, SocketEvent.OPEN_READ, true))
然后调用processSocket 进行处理,

1
2
3
4
5
6
7
8
9
10
11
12
13
14
15
16
17
18
19
20
21
22
23
24
25
26
27
28
29
30
31
32
33
public boolean processSocket(SocketWrapperBase<S> socketWrapper,
SocketEvent event, boolean dispatch) {
try {
if (socketWrapper == null) {
return false;
}
SocketProcessorBase<S> sc = null;
if (processorCache != null) {
sc = processorCache.pop();
}
if (sc == null) {
sc = createSocketProcessor(socketWrapper, event);
} else {
sc.reset(socketWrapper, event);
}
Executor executor = getExecutor();
if (dispatch && executor != null) {
executor.execute(sc);
} else {
sc.run();
}
} catch (RejectedExecutionException ree) {
getLog().warn(sm.getString("endpoint.executor.fail", socketWrapper) , ree);
return false;
} catch (Throwable t) {
ExceptionUtils.handleThrowable(t);
// This means we got an OOM or similar creating a thread, or that
// the pool and its queue are full
getLog().error(sm.getString("endpoint.process.fail"), t);
return false;
}
return true;
}

这里就会调用 createSocketProcessor 进行处理了,不过这是下一篇的内容了。

首先是跳转,应该说设置状态,其中跳转是其中一个状态,

1
2
3
4
@RequestMapping(value = "request1", method = RequestMethod.GET)
public void request1(HttpServletRequest request, HttpServletResponse response) {
response.setStatus(HttpServletResponse.SC_OK);
}

200 状态就很简单,如果想做跳转可以使用 302 并设置 location

1
2
3
4
5
@RequestMapping(value = "request2", method = RequestMethod.GET)
public void request2(HttpServletRequest request, HttpServletResponse response) {
response.setHeader("Location", "https://baidu.com");
response.setStatus(HttpServletResponse.SC_MOVED_TEMPORARILY);
}

这里如果设置了 302,但没设置跳转 location,就是 302 found

1
2
int SC_MOVED_TEMPORARILY = 302;
int SC_FOUND = 302;

而如果是 301 跳转,代表原地址不可用了,永久跳转

1
2
3
4
5
@RequestMapping(value = "request3", method = RequestMethod.GET)
public void request3(HttpServletRequest request, HttpServletResponse response) {
response.setHeader("Location", "https://baidu.com");
response.setStatus(HttpServletResponse.SC_MOVED_PERMANENTLY);
}

另一个问题是设置 cookie

1
2
3
4
5
6
@RequestMapping(value = "request4", method = RequestMethod.GET)
public void request4(HttpServletRequest request, HttpServletResponse response) {
Cookie cookie = new Cookie("a", "b");
response.addCookie(cookie);
response.setStatus(HttpServletResponse.SC_OK);
}

这样的设置就能成功设定 cookie,而随着目前的浏览器 cookie 策略,如果要跳转后设置的话,估计是会越来越难,包括

1
response.addHeader("Set-Cookie", "a=b; domain=baidu.com; SameSite=none;Secure");

这样的方式也没法实现。

Tomcat 会把请求委托到
org.springframework.web.servlet.DispatcherServlet#doService

1
2
3
4
5
6
7
protected void doService(HttpServletRequest request, HttpServletResponse response) throws Exception {
logRequest(request);

// 省略前面的代码
try {
doDispatch(request, response);
}

然后就是调用
org.springframework.web.servlet.DispatcherServlet#doDispatch

1
2
3
4
5
6
7
8
9
10
11
12
13
14
15
16
17
18
19
20
21
22
23
24
25
26
27
28
29
30
31
32
33
34
35
36
37
38
protected void doDispatch(HttpServletRequest request, HttpServletResponse response) throws Exception {

try {
ModelAndView mv = null;
Exception dispatchException = null;

try {
processedRequest = checkMultipart(request);
multipartRequestParsed = (processedRequest != request);

// 去获取处理器
// Determine handler for the current request.
mappedHandler = getHandler(processedRequest);
if (mappedHandler == null) {
noHandlerFound(processedRequest, response);
return;
}

// Determine handler adapter for the current request.
HandlerAdapter ha = getHandlerAdapter(mappedHandler.getHandler());

// Process last-modified header, if supported by the handler.
String method = request.getMethod();
boolean isGet = HttpMethod.GET.matches(method);
if (isGet || HttpMethod.HEAD.matches(method)) {
long lastModified = ha.getLastModified(request, mappedHandler.getHandler());
if (new ServletWebRequest(request, response).checkNotModified(lastModified) && isGet) {
return;
}
}

if (!mappedHandler.applyPreHandle(processedRequest, response)) {
return;
}

// Actually invoke the handler.
mv = ha.handle(processedRequest, response, mappedHandler.getHandler());

看下这里的逻辑

1
2
3
4
5
6
7
8
9
10
11
12
@Nullable
protected HandlerExecutionChain getHandler(HttpServletRequest request) throws Exception {
if (this.handlerMappings != null) {
for (HandlerMapping mapping : this.handlerMappings) {
HandlerExecutionChain handler = mapping.getHandler(request);
if (handler != null) {
return handler;
}
}
}
return null;
}

可以看到有这些 HandlerMapping

而这里面就是前面提到过的
org.springframework.web.servlet.mvc.method.annotation.RequestMappingHandlerMapping
从这就能找到具体的 Handler
com.nicksxs.spbdemo.controller.DemoController#test()
这就是我简单的示例代码

1
2
3
4
5
6
7
8
9
@RequestMapping(value = "/test", method = RequestMethod.GET)
@ResponseBody
public DemoResponse test() {
String item = "{\"id\": 1, \"name\": \"nick\"}";
ParserConfig parserConfig = ParserConfig.getGlobalInstance();
parserConfig.propertyNamingStrategy = PropertyNamingStrategy.SnakeCase;
DemoResponse response = JSON.parseObject(item, DemoResponse.class, parserConfig);
return response;
}

下一步是再获取处理器的适配器,
org.springframework.web.servlet.mvc.method.annotation.RequestMappingHandlerAdapter

1
2
3
4
5
6
7
8
9
10
11
protected HandlerAdapter getHandlerAdapter(Object handler) throws ServletException {
if (this.handlerAdapters != null) {
for (HandlerAdapter adapter : this.handlerAdapters) {
if (adapter.supports(handler)) {
return adapter;
}
}
}
throw new ServletException("No adapter for handler [" + handler +
"]: The DispatcherServlet configuration needs to include a HandlerAdapter that supports this handler");
}

正好这个适配器是调用的父类的 supports 方法

1
2
3
4
@Override
public final boolean supports(Object handler) {
return (handler instanceof HandlerMethod && supportsInternal((HandlerMethod) handler));
}

而我这个com.nicksxs.spbdemo.controller.DemoController#test()
就是个包装好的 HandlerMethod
然后就是调用 hahandle 方法,也是通过模板方法,实际调用的是
org.springframework.web.servlet.mvc.method.AbstractHandlerMethodAdapter#handle

1
2
3
4
5
6
7
@Override
@Nullable
public final ModelAndView handle(HttpServletRequest request, HttpServletResponse response, Object handler)
throws Exception {

return handleInternal(request, response, (HandlerMethod) handler);
}

然后调用
org.springframework.web.servlet.mvc.method.annotation.RequestMappingHandlerAdapter#handleInternal

1
2
3
4
5
6
7
8
9
10
11
12
13
14
15
16
17
18
19
20
21
22
23
24
25
26
@Override
protected ModelAndView handleInternal(HttpServletRequest request,
HttpServletResponse response, HandlerMethod handlerMethod) throws Exception {

ModelAndView mav;
checkRequest(request);

// Execute invokeHandlerMethod in synchronized block if required.
if (this.synchronizeOnSession) {
HttpSession session = request.getSession(false);
if (session != null) {
Object mutex = WebUtils.getSessionMutex(session);
synchronized (mutex) {
mav = invokeHandlerMethod(request, response, handlerMethod);
}
}
else {
// No HttpSession available -> no mutex necessary
mav = invokeHandlerMethod(request, response, handlerMethod);
}
}
else {
// 是否要锁定 session,否则走到这
// No synchronization on session demanded at all...
mav = invokeHandlerMethod(request, response, handlerMethod);
}

继续调用
org.springframework.web.servlet.mvc.method.annotation.RequestMappingHandlerAdapter#invokeHandlerMethod

1
2
3
4
5
6
7
8
9
10
11
12
13
14
15
16
17
18
19
20
21
22
23
24
@Nullable
protected ModelAndView invokeHandlerMethod(HttpServletRequest request,
HttpServletResponse response, HandlerMethod handlerMethod) throws Exception {

ServletWebRequest webRequest = new ServletWebRequest(request, response);
try {
WebDataBinderFactory binderFactory = getDataBinderFactory(handlerMethod);
ModelFactory modelFactory = getModelFactory(handlerMethod, binderFactory);

// 包装调用方法,
ServletInvocableHandlerMethod invocableMethod = createInvocableHandlerMethod(handlerMethod);
// 省略一部分非本次关注核心代码
// 然后是调用到这
invocableMethod.invokeAndHandle(webRequest, mavContainer);
if (asyncManager.isConcurrentHandlingStarted()) {
return null;
}

return getModelAndView(mavContainer, modelFactory, webRequest);
}
finally {
webRequest.requestCompleted();
}
}

稍微再看一眼
第一步是
org.springframework.web.servlet.mvc.method.annotation.RequestMappingHandlerAdapter#createInvocableHandlerMethod

1
2
3
protected ServletInvocableHandlerMethod createInvocableHandlerMethod(HandlerMethod handlerMethod) {
return new ServletInvocableHandlerMethod(handlerMethod);
}

第二步是
org.springframework.web.servlet.mvc.method.annotation.ServletInvocableHandlerMethod#ServletInvocableHandlerMethod(org.springframework.web.method.HandlerMethod)

1
2
3
   public ServletInvocableHandlerMethod(HandlerMethod handlerMethod) {
super(handlerMethod);
}

第三步是
org.springframework.web.method.support.InvocableHandlerMethod#InvocableHandlerMethod(org.springframework.web.method.HandlerMethod)

1
2
3
   public InvocableHandlerMethod(HandlerMethod handlerMethod) {
super(handlerMethod);
}

第四步是
org.springframework.web.method.HandlerMethod#HandlerMethod(org.springframework.web.method.HandlerMethod)

1
2
3
4
5
6
7
8
9
10
11
12
13
protected HandlerMethod(HandlerMethod handlerMethod) {
Assert.notNull(handlerMethod, "HandlerMethod is required");
this.bean = handlerMethod.bean;
this.beanFactory = handlerMethod.beanFactory;
this.beanType = handlerMethod.beanType;
this.method = handlerMethod.method;
this.bridgedMethod = handlerMethod.bridgedMethod;
this.parameters = handlerMethod.parameters;
this.responseStatus = handlerMethod.responseStatus;
this.responseStatusReason = handlerMethod.responseStatusReason;
this.description = handlerMethod.description;
this.resolvedFromHandlerMethod = handlerMethod.resolvedFromHandlerMethod;
}

这是个继承关系,一直调用到最顶层的父类的构造方法,其实就是拷贝,然后继续调用
org.springframework.web.servlet.mvc.method.annotation.ServletInvocableHandlerMethod#invokeAndHandle

1
2
3
4
5
6
7
public void invokeAndHandle(ServletWebRequest webRequest, ModelAndViewContainer mavContainer,
Object... providedArgs) throws Exception {

// 调用请求
Object returnValue = invokeForRequest(webRequest, mavContainer, providedArgs);
// 稍微忽略下后面的代码
}

继续调用
org.springframework.web.method.support.InvocableHandlerMethod#invokeForRequest

1
2
3
4
5
6
7
8
9
10
@Nullable
public Object invokeForRequest(NativeWebRequest request, @Nullable ModelAndViewContainer mavContainer,
Object... providedArgs) throws Exception {

Object[] args = getMethodArgumentValues(request, mavContainer, providedArgs);
if (logger.isTraceEnabled()) {
logger.trace("Arguments: " + Arrays.toString(args));
}
return doInvoke(args);
}

来到了最核心处
org.springframework.web.method.support.InvocableHandlerMethod#doInvoke

1
2
3
4
5
6
7
8
9
10
11
@Nullable
protected Object doInvoke(Object... args) throws Exception {
Method method = getBridgedMethod();
ReflectionUtils.makeAccessible(method);
try {
if (KotlinDetector.isSuspendingFunction(method)) {
return CoroutinesUtils.invokeSuspendingFunction(method, getBean(), args);
}
// 会走到这里,获取到 bean,而这个 bean 就是前面构造方法里赋值的,最开始被放在 handler 里面,然后调用方法
return method.invoke(getBean(), args);
}
0%